My version of a Twix Cake!
As you may know, when it is one of the kid’s birthdays they get to pick the Sunday dinner and the cake. Brandon’s birthday was this past week and he always comes up with something creative….one year it was a peanut butter cake and one year a Hersey Black Out Candy Bar Cake. One year he wanted a Samoa cake, as in the Girl Scout Cookie…didn’t feature that one but it was TO. DIE. FOR!
This year it was a Twix Cake!
Wow….now that is a new one. I googled “Twix Cake” and I found a few interesting versions
I decided to make my own version!
I started with pound cake.
You can buy pound cakes at your local bakery…or even frozen pound cakes.
I decided to bake my own and used this recipe. I baked two cakes in loaf pans.
I wanted layers. Why layers….well, this is where I got a bit creative. You can skip this step entirely and skip right to the caramel topping…but as usually I went a tad overboard.
After I flipped each out of the pans (always flip after 10 minutes of cooling), I put them in the fridge for an hour or two. Then I took a serrated knife and slivered about 1/4” off of the sides and ends (the importance of this step will be evident in just a bit), cut the tops off both, then cut each cake in half horizontally.
Basically I ended up with four layers.
Any time I make a layer cake, I bake the cake the day before then cool it in the fridge. Putting it back in the refrigerator between each step makes it easier to handle. If you need to bake the cake days in advance, you can wrap it in wax paper then plastic wrap and freeze it.
I decided to put caramel butter cream frosting between each layer. I made my regular vanilla buttercream frosting, substituting plain ole’ ice cream caramel sauce for 1/4 of the butter….can’t get much easier.
I coarsely chopped a few Twix candy bars and sprinkled them on the caramel butter cream icing between each layer, stacked the layers, then crumb coated the entire thing with the caramel icing.
In case you don’t know what a “crumb coat” is, it is basically a super thin layer of icing over the entire cake to seal the crumbs, then you put it into the fridge. It’s not pretty but it makes the final coat of icing SOOOO much easier and prettier. I do this with every cake regardless of what I am icing it with…makes it super easy to get a good, clean layer of frosting on the cake. Google it!
After the crumb coat has set well, I set the cake back into the loaf pan lined with wax paper. This is why it was important to trim off the edges of the cake…so it would easily fit back into the loaf pan.
Make sure the wax paper sticks up about 1-2” inches above the cake.
Now, this is the tricky part of this whole cake. Caramel.
I microwaved 20 caramels…30 seconds at a time…mixing between each 30 second zap…kind of like I do to melt chocolate. You want the caramel to be melted but NOT boiling! Then I added cream (or you can use milk) to the caramel just to thin it a bit.
Now, the trick is to let the caramel cool enough that you can spoon it onto the top of the cake…but not so cool that it is too thick to level out,..because if you try to “ice” it on to the top you will pull up the crumb coat.
After you have the caramel mixture spooned on top and relatively level, push the wax paper against the sides to get a good sharp edge.
Put it all back in the fridge until the caramel has set solid.
Okay, I lied…THIS is the tricky part…removing the wax paper. It comes right off the edges of the cake but it wants to stick to the caramel and when I tried to pull it off it pulls the caramel off the top of the cake.
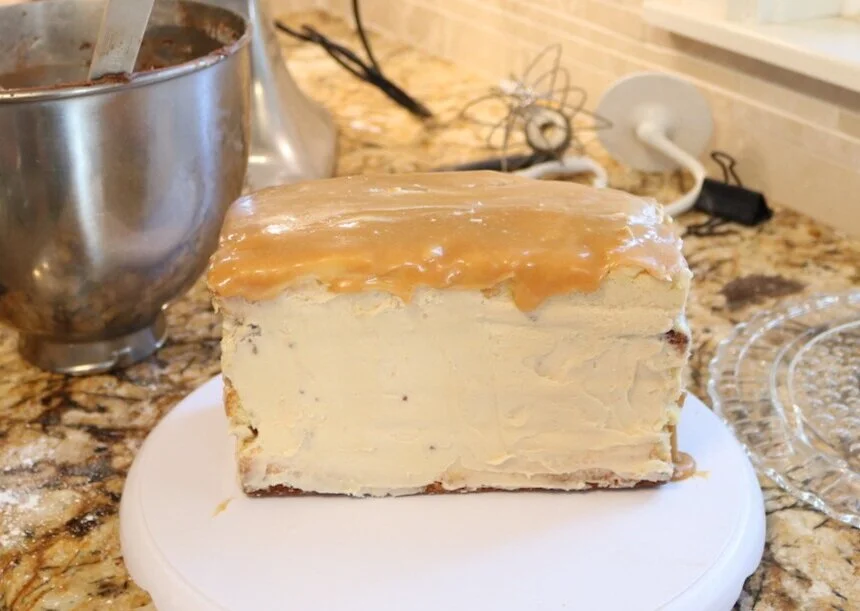
So, what to do? Well, first I picked off as much wax paper as I could, a little at a time. Then I took a sharp knife dipped in SUPER hot water and “trimmed” the caramel where the wax paper was stuck. It really wasn’t as hard as it sounds but I didn’t want any paper stuck to the caramel and I didn’t want to pull the caramel off the top of the cake.
Then I used my hands to “push” the caramel and make relatively straight edges.
I really think my problem was that the caramel was to “firm”…not enough cream/milk. You want it to set relatively firm but not so firm it will be hard to cut…but you also don’t want it too “runny.” I think the combination of 20 caramels and 1/4 cup of cream/milk is a pretty good mix! (This is where I will admit that I peeled off the super thick caramel, re-microwaved it and added more cream! The resulting caramel layer was softer)
Back in the fridge.
After everything has cooled well, I iced it with chocolate buttercream icing and covered the top and base with chopped Twix bars.
OH. MY. GOSH.
I am off sugar, but I snuck a taste. Holy cow that is some delicious cake!!!The pound cake is dense enough to stack four layers without any support…and buttercream icing? Doesn’t matter what flavor, it is a winner EVERY time!!!
I noted when I made Matt and Hannah’s wedding cakes that I am NOT a baker! But I love making dinners and desserts my kids love and special birthday cakes are always something they really appreciate.
Perfection is NOT the goal when experimenting with “special” cakes….taste is important, but even the worst failures aesthetically can taste amazing!