Visiting history...

This past week we traveled to Phoenix to visit my oldest son. While we were there we decided to do a little sight seeing.

First we headed north to the south rim of the Grand Canyon.

I’ve seen pictures but no matter how beautiful the photos are, they do not do it justice. It is one of those places you have to see in person. And while you stand on the rim of this vast canyon and TRY to wrap your brain around the fact that the lowest level of exposed rock is TWO BILLION years old, you suddenly realize how “minute” your time on this earth truly is. My mind just can not comprehend that span of time but it can certainly appreciate the beauty of this marvel.

If you have not seen it, go.

We spent one day shopping around Old Scottsdale…okay, so I am not big on shopping so we walked around peaking in windows, exploring the history of the town! We pretty much ran through the Phoenix zoo while killing time before the Cubs game. Brian is from Chicago so he thoroughly enjoyed the game and his Chicago hot dog….a treat from his past.

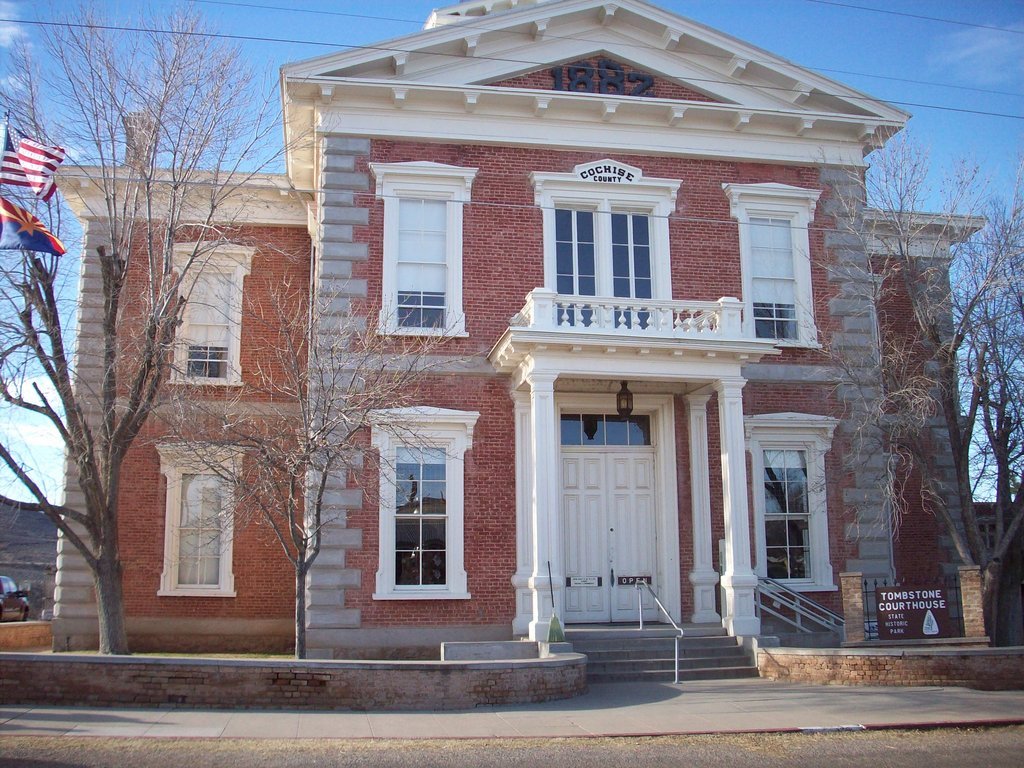
Tuesday we drove south to Tombstone. The movie “Tombstone” is one of our all time favorites so it was fun to see the Grand Hotel (now the Big Nose Kate Saloon)….

Boothill Cemetery, where the McLaury brothers and Billy Clanton, killed during the OK Coral Shootout, are buried.

The old county courthouse has been beautifully preserved as a museum.

One thing I found interesting was this display of ironstone and old scales, considering today’s decor trends….

Compared to TWO BILLION YEARS, the 140 year history of Tombstone seems like it happened yesterday. It is a time in history that interests us and we enjoyed exploring the little town.

Which brings me to MY history. The day we came home, a friend posted on Facebook that an old building downtown was being torn down. It is the building that first housed the company my dad worked for from 1972 until his death in 1995.

This old building is part of MY history…I was 7 when we moved here in 1971 and this is company my dad worked for through out my childhood and for much of his adult life.

It is soooo sad to see old historical buildings disappear….

….this one is being bulldozed for a parking lot.

I knew I wanted a “momento” from the old building so I contacted the company that was hired to demolish it.

Frank from SSi Construction was SO helpful…much of the building had already been torn down but he patiently picked through the piles of ruble and pulled out a few splintered boards. I pulled all the nails and cut off the splintered ends and hope to clean them up and make a table or bench out of them…reclaimed wood with some serious “sentimental value.”

Forty years…140 years…two billion years. History is relative. Regardless, it is fun to explore. Most importantly, cherish and preserve.

VW Bus chest of drawer makeover....

This, I believe, is my favorite dresser (technically a chest of drawer) makeover!

I first found my “inspiration” here….I knew the minute I saw this I had to do one! All I had to do was find perfect waterfall chest.

I bet I have passed on a few hundred over the years. They aren’t terribly “sturdy” dressers and because of that they tend to be in pretty bad shape after a few decades of use.

Just so happens a friend who owns a vintage store posted one on Facebook market place. It was a tad higher than what I wanted to pay but I wanted it NOW!

Most of the decorative doo-dads on waterfall pieces are painted on but this one had actual carvings…

…which meant I had to fill the carving….curses.

But whatevs….

I usually use the wood filler I pick up at Lowe’s and have always been happy with it but I saw this product on another blog and decided to give it a try…

Meh…It’s okay but I have to order it and price wise it’s not worth it. I think I will just stick to the product I have been using.

Remember when you use wood fillers to “patch” you may have to sand and reapply 2-3 times before you get a smooth repair…patience!

This little project took a lot longer than my normal KSTP project because of all the different paints…each “layer” had to dry before I could paint the next layer.

But the overall process was the same…first, patch and repair, then Kilz, sand and wipe with tack cloth, then paint on the design (KSTP). The white is lacquer and the other paint colors are some latex I had on hand…most of it “custom” mixed.

TOO. STINKING. CUTE!!!!

I used some round knobs I had in my stash and painted them the same color as the drawers. The “window wipers” are stainless pulls.

I wanted to buy an actual VW Bus emblem but they were pretty pricey for a “makeover-for-resale” project so I bought a vinyl decal from HERE and it looks great!

The details were a combination of freehand, taping and a few homemade templates. Seriously, you do not have to be super creative to do something like this…just patient and skip the coffee for a day…lol!

I sure hope Larissa believes “imitation is the sincerest form of flattery.”

This weekend we are headed to Phoenix so I probably won’t be around next week!

Until next time…

Sparking "joy" and my thoughts on purging....

Marie Kondo,…founder of the KonMari method ….an “organizational guru” who is all the rage now thanks to her Netflix show.

Her book, “The Life Changing Magic of Tidying Up” is worth the read…if nothing else it may inspire you to get off your butt and get organized!

I follow her methods to some extent…but I kinda get hung up on the “verbage.”

Tidying up is what I do before I go to bed at night…pick this up, put that away, wipe the counter down, blow the cookie crumbs off the table. ( I shared here how I keep my house “clean” and I love this blog article on “tidy people.”)

What she refers to as “tidying up” is what I call an all out “purge assault.” It is when I empty out the entire drawer, closet or dresser and toss stuff i have to think about for more than 3 seconds…none of this “does it spark joy” thing. If I have to think about it’s usefulness or importance for more than 3 seconds it’s a goner!

Joy…I actually “googled” the definition of joy…

Dictionary result for joy

/joi/

noun

  1. 1.

    a feeling of great pleasure and happiness.

    "tears of joy"

    synonyms:delight, great pleasure, joyfulness, jubilation, triumph, exultation, rejoicing, happiness, gladness, glee, exhilaration, ebullience, exuberance, elation, euphoria, bliss, ecstasy, transports of delight, rapture, radiance;

I guess you could say there are some innate objects that can “spark joy.” But truth be told, I am going to save that “sparking joy” feeling, in the true sense of the word, for more important things…like important people in my life…because they are what bring me “great pleasure” and true happiness.

A casserole dish…not so much! I can honestly say there is not one word in the definition of joy that describes my feelings towards a casserole dish…or a highlighter pen…or even a comfy pair of shoes.

Do I NEED a casserole dish…yes…does it “spark joy” when I hold it? Probably not.

When I cleaned out my kitchen cabinets

…I found FIVE identical casserole dishes, two of which were missing lids…the question for me was not “do they spark joy” but rather WTFrick! Do I really NEED five identical casserole dishes, two of which don’t even have lids. If I have to think about that for more than 3 seconds, the answer is no…so then I start working my way down. Four? Three? Two…yes in less than 3 seconds, so three of them got tossed (tossed meaning donated in this case!)

If you think three seconds is too short of time to make such a profound decision, ask your husband if he loves you. What would your reaction be if he hesitated for three seconds?

I truly believe if innate objects spark “joy”…if they give you feelings of “delight, great pleasure, joyfulness, jubilation, triumph, exultation, rejoicing, happiness, gladness, glee, exhilaration, ebullience, exuberance, elation, euphoria, bliss, ecstasy, transports of delight, rapture, radiance”… you may need to reevaluate what is important in your life.

People…your spouse, your children, your parents, you siblings, your dear friends…this is what should “spark joy.” And I kinda have to throw my pets in there too…as frustrating as they can be at times, they do bring me “joy".”

Yes, I believe our homes should spark feelings of happiness…peace…serenity…and even joy. But I BELIEVE it should be the “whole of the sum”…not individual little “things” that spark those feelings.

Look at (or even imagine) the perfect vignette in your home…maybe a reading nook…a perfect, comfy chair with a perfect little table decorated with beautiful little knick-knacks, perfect little throw and pillow, plush little rug, a reading lamp with the perfect bulb for reading…the walls around it are decorated with beautiful botanical prints…this space does indeed “spark joy.” But is it the WHOLE space…or is it each little individual element?

If my house was on fire, would I save members of my family and pets or my “stuff?”

So how do I stay organized?

I use the “pile method.” When I was a teenager my mom went in my room and emptied EVERYTHING into a big pile in the middle of the floor…then told me I wasn’t doing anything until the pile was sorted. Ugh!!!

But you know what, I find the “pile method” works wonders…I empty the entire master closet (or kitchen drawer or makeup drawer or dresser) into a huge pile in the middle of the floor…EVERYTHING!!

First, I use this opportunity to really deep clean the empty space.

Then I start working my way through the pile.

And remember, if I have to think about something for more than 3 seconds, it gets tossed!

Trash…sometimes the “stuff” is just plain ole’ trash. I watch those “Hoarder” shows and my first thought is IT’S JUST TRASH. Now, if you have some weird attachment to what is obviously “trash” I am going to strongly suggest you get some professional help.

How do I define “trash?” Anything a NORMAL person would not want. I have a lot of paint clothes….when it is time to get rid of it, I ask myself “Would a normal person want a landscape company t-shirt covered in paint?”

Trash.

When I am purging, I always keep a “hesitation bag.” You know, that stuff you just aren’t sure you want to get rid of…the jeans you hope to someday wear again, the sweatshirt your son brought you from his vacation 5 years ago, those dishes your mom gave you for Christmas that have a fancy gold rim so you can’t put them in the microwave or the dishwasher.

Dang…do I REALLY want to get rid of those things? So I put them in my hesitation bag/box and set it in the garage. In about 2-3 weeks, I pick it up, put it in the car and drop it off at the donation center….every time! (Don’t forget to get a receipt!)

And you know what…not one time have I regretted it.

There are also those items that really don’t need to be in the space you THINK they should occupy. I have small kitchen appliances I rarely use…like the three pot slow cooker I use Thanksgiving and Christmas, the blender I use 2-3 times a year to make salsa, the large coffee pot I use 1-2 times a year when I have company. Those are all stored in the hall closet. I have a large pantry in my master closet where I store my office supplies as well as my personal care stockpile…shampoo, conditioner, deodorant, lotion, soap, etc. Things you rarely use do not have to be stored in spaces that may be needed for daily use items, even though that is where you think it is SUPPOSE to go. Don’t be afraid to think outside the box when you are tight on storage space!

My goal is to “purge” at least 1/2 of what is in the pile…whether it be trash, store elsewhere, donate or hesitation. I don’t always hit that goal, but I can usually make a pretty big dent. Everything put back into the space is folded neatly and clean…if I don’t want to clean it or fold it, I probably don’t care too much for it anyway…so it gets donated or trashed!

Also, I am not big on cute baskets, boxes and bins. As I have mentioned before, I like to see what I have…

(Again, you can see here how I “thought outside the box” and moved my pots and pans into the pantry.)

If things are in a box or basket, I probably don’t know what I have. If I have things that need to be organized in a box or bin (like ribbon or cords) I put them in clear storage tubs so I can see what is in there!

The older I get the less tolerant I am of “stuff.” I see all those cute organizational tools like baskets, bins and boxes and I think, “do you REALLY need all that “stuff?” How many serving spoons do you REALLY need, how many coffee cups do you REALLY need, how many RCA cables do you REALLY need!

I just don’t think “stuff” should “spark joy” in the real sense of the word.

Like everything else, I say DO WHAT WORKS FOR YOU! Read the book and try this method of “tidying up.” It is a simple little read and like me, you may find motivation to “tidy up.” If the process works for you, GREAT!

If this methods gets your life and home in order, I am all for it. Because in the end, a home that is your haven, the place that brings you peace and serenity, THAT is something that sparks joy!

Herringbone dresser top....

I would love to take credit for all my incredibly creative makeovers but truth is I get a lot of inspiration from a lot of sources…Pinterest, other DIY bloggers, and random website.

This time it was my son. He found a really awesome entry bench online and built one for himself!

I shared his entry makeover here.

His girlfriend loved it so much he made her a desk for Christmas!

So when this dresser top turned out super cruddy, I decided to put a herringbone top on it.

The top is a veneer and had some “bubbling.”

I was able to sand the “bubbles” so that the top was smooth, but when I sanded, it took the stain and finish off and the gel stain just wasn’t covering it.

I could have sanded the entire top and removed all the stain and finish…or I could have painted it…. but nah….I kinda wanted an excuse to do something “different.”

Matt was out of town and couldn’t help me so he sent me THIS link…AWESOME tutorial. These girls do a bang up job on the video tutorial…if you love the look, they tell you exactly how to do it!

The top of the dresser hung over the front quite a bit so I decided to use my Kreg rip cut guide to cut down the top a tad.

My daughter got it for me for Christmas and this is the first time I was able to use it…LOVE! I have always used my “yard stick” trick to make straight cuts with my skill saw…this was SOOOO much better!!!

Using the linked tutorial, I started laying out the top. I used white pine 1x4 for the top boards and 1x2 for the edge banding.

Now, this is where I had to deviate a tad from the tutorial. Because I was covering a dresser top and not making a new top that I could flip over to cut down, I had to cut the herringbone boards from the top. If I covered the entire top before the cut, I wasn’t going to be able to “see” the edges of the existing top to know where to make my cut. So I laid all but the corner boards, used my long metal guide to draw my cut marks on all four sides, and then cut those boards first. Then I nailed down the corner pieces, marked them, and cut them.

I used a palm sander to sand all the edges before applying the trim boards around all four sides.

I puttied the holes with wood filler, let that dry, then I sanded the top and sides smooth. Remember, stain will not adhere to glue, so you want to make sure you sand well and remove any glue residue!

After sanding I applied the stain…pine does not take penetrating stain well so I used General Finishes gel stain. There will be tiny gaps between the boards…to get the stain down in between those gaps, I used a small craft brush. I sprayed on a polycrylic finish to seal it!

I had kilzed and sanded the cabinet and the drawer fronts before working on the top. After the stain dried, I painted those a “steel blue.” (Again, don’t ask me the color…it is a mix of blues and black I had on hand!)

I wanted to use the existing hardware but I wasn’t digging the original finish. I primed them with metal primer and painted them flat black…soooo much better and far cheaper than replacing it with new.

Just another “ick” saved from a life of “yuck.”

Again, you don’t have to go all fancy…I could have easily painted the top…but the tutorial on “Shanty-2-Chic” is super easy to follow!

Another MCM dresser makeover!

This is not a dresser…this is a chest of drawers. I think there is often confusion, and I am the world’s worst at referring to a chest of drawers as a dresser.

There is a difference!

But seriously who cares…lol!

Regardless of what you call it, it was A MESS! But oh the potential.

My very first love…MCM pieces. It would take a month of Sundays to link to all the MCM pieces I have refinished…just search MCM or mid century on this site. Truth be told I would have kept every one of them if I didn’t have a fear of being featured on Hoarders. So I find pieces I love, give them a good little makeover and am sincerely happy when someone else gives them a good home.

In spite of all it’s flaws, I loved this piece. It had the normal wear and tear, a seriously cruddy finish, a chipped wood handle (aren’t those wood handles AMAZING!!!!) and what I THOUGHT was some stains around the hardware on the top drawer…turns out it is a beautiful wood inlay. But you couldn’t really tell because the finish was so icky. (The missing knob was in the drawer…yipeee!)

Let’s be honest, we will all have a pretty worn finish after 60 years on this earth!

My first thought was to paint the wood handles an accent color so I could repair the chip. My daughter suggested I just strip them first. So glad I listened to her. I used this process to strip the drawer fronts, handles and legs…the old stain came off the wood handles and revealed a beautiful white wood (oak, teak? Couldn’t tell)….LOVE!!! I sanded the chip down…and you know what, I can live with it….it is obvious it isn’t the way it is suppose to be but HEY…this is a vintage piece and vintage pieces are going to have a few boo-boos!

The drawer fronts and base were stripped and oiled, the cabinet was given a KSTP treatment (Kilz, sand, tack and painted with white high gloss enamel)

(After I took the pictures, I saw the VERY fine over spray on the top drawer…curses…a little mineral spirits cleaned it right off!)

Personally, I love the high contrast of the wood handles and walnut veneer. The Lane Acclaim tables I collect have the same stark contrasting wood detailing when I refinish them…LOVE!

Often vintage pieces would have been stained and finished so all the differing woods and the entire piece had a “uniform” look and the grain detail was toned down a bit. I say LET IT SHINE BABY!!! If you are a “purist” and want vintage pieces to reflect their original state, you probably don’t want to use the processes I use to refinish pieces!

I am all for exposing the grain and the natural color of the wood.

And I am all for bringing the old pieces back to life!

MORE makeovers...

Surprisingly I have MORE makeovers to share. The weather has been fairly cold and dreary but we have had enough warm days here and there to get a little work done. I get kind of lazy during the winter months…when it is cold and dreary I like to curl up and read. When it is warmer, I NEED to be out working…either at the apartments or on projects.

This first dresser makeover is something you could pretty much do inside on a cold day.

The only thing I had to take it outside to do was distress and seal. But honestly you could do both inside.

I use latex paint for my chalk paint recipe (5 tbs. of Plaster of Paris, 3 tbs. of water, mixed well, then add 2 cups of flat latex paint) and that can used inside.

To do a “wet sand” you would use a sponge with a scrubby on one side…something like this…

After the second coat of chalk paint, before it has thoroughly dried, you would take your sponge, wet it (DAMP NOT DRIPPING!) and start “scrubbing” the areas you want to distress…kind of like dry sand distressing. Keep a bucket of water on hand to rinse the sponge periodically. Doing it like that cuts down on the “dust” created when you dry sand, so you can do it inside.

Then I just seal the entire piece by brushing on a polycrylic (or wax if that is your preference.)

Rather than spend the money on all new hardware, I painted the existing hardware. I use a spray primer and spray paint so that needs to be done outside…but truthfully, you could live with the existing hardware until warmer weather…or just replace it.

But all in all, you COULD do this entire project inside…and it is well worth the time when you consider how much better it looks!

This next piece pretty much had to be done outside on warmer days…I wanted a high gloss lacquer finish on the cabinet and that entails spraying. And I wanted to strip the old finish on the drawer fronts and that definitely has to be done outside.!

I removed and labeled each drawer…that is a MUST because the drawers need to go back into their original position…just mark the underside with a pencil.

I removed the old finish on the drawer fronts using THIS process! I know I refer back to this tutorial a lot, but it is the BEST way to remove old finish or paint…it works and on projects like this, it probably only took me about 30 minutes to remove the old finish on these drawer fronts. Once the old finish was removed, I applied three coats of tung oil finish, rubbing with 0000 steel wool and tack cloth between each coat.

I sprayed the “cabinet” with Kilz, sanded and wiped with tack cloth, and then sprayed 3 LIGHT coats of white lacquer (KTSP).

As you can see from the “before” picture, it did not have legs…but it would have originally and there was even places on the underside to screw in the legs. I ordered new legs HERE and stained them to match the oiled drawer fronts.

Each is completely different and each required a different technique…but both were relatively simple and make a huge impact.

AGAIN, I am sharing how easy it is to do this because AGAIN…

LIFE IS TOO SHORT TO LIVE WITH UGLY FURNITURE!


Just ANOTHER makeover!!!

A few weeks ago I promised to share some of these makeovers….

I shared the details of this one….

here….

It sold in a couple of days!

This chest was a mess…

It is solid wood and pretty sturdy. A few of the drawer tracks needed some minor repairs but all in all it was a decent piece…just super ick.

Again, I have to have my “wood fix.” Since the drawer fronts were solid wood, I decided to use gel stain on them.

First I removed all the old hardware and gave the entire piece a good cleaning with a mild detergent.

There is no need to remove the old finish when using gel stain…maybe a light sanding to remove any boogers and dull the shine on the existing finish.

I ONLY use General Finishes brand gel stain. I applied three LIGHT coats with an athletic sock over a rubber glove, allowing each coat to dry overnight. The first coat will look like crud, the second will look a tad better, the third coat looks awesome. I sprayed on polycrylic to seal them. General Finishes has a wipe-on poly and it is pretty awesome…but I had polycrylic on hand so that is what I used.

I sprayed the “cabinet” with Kilz, sand, tack and latex paint (KSTP). I ALWAYS use an additive with paints I am going to roll and brush…Flotroel for latex.

New hardware…and PRESTO….

Another piece saved from the clutches of ugly and dated!
I share these makeovers to remind you….IT’S NOT HARD to take dated, ugly furniture and turn it into something you will be proud to have in your home.

Life is too short to live with ugly furniture!

Pretty in Pink...

If you “came of age” in the 80’s chances are you saw a John Hughes film. If you haven’t, you are missing out! “Pretty in Pink” was one of my favorites! Check them out…you won’t be disappointed and I can’t think of one that isn’t “kid friendly.”

Which brings me to pink…a color I have always loved but have never really used in my home decor. I must have gotten a “pink bug” because all of a sudden I can’t seem to get enough of it….and since next week is Valentine’s Day, this is a great time to infuse a little pink into my home decor under the guise of “decorating for the holiday.”

I found this little bench in 410 Vintage…the tag said it is walnut but I really think it is mahogany. I used this process to refinish the frame and recovered the seat with the same pink velvet I used for the club chair pillow (makeover here).

Several years ago I refinished a little piano bench to set by the closet so I would have a place to sit and put my shoes on.

In one of my “purging” marathons I moved it out but in all honesty I kinda missed it…so this little bench is a perfect little replacement!

I love my office…a simple room that is really multi purpose…a “thoroughfare” from the living spaces to the master bedroom, a “dressing room,” and of course, an office.

I featured the desk here.

I have seen a few desks over the years that peaked my interest but I still love this desk…it is perfect! Prime example of “buy what you TRULY LOVE and you will never tire of it!”

My office chair looks a lot like a Marcel Gascoin C-chair….I can’t find a picture of this exact chair so I don’t know for certain! Again, I don’t buy pieces like this for their potential value…but because I LOVE them.

I bought it years ago and share it’s little makeover here. Again, still love it!

I have replaced the dresser several times over the years but I LOVE this one! Shared the makeover here and while I loved the dresser that was here before, this one is MORE better!

The little bookcase…just adorbs!

I digress…off to the living room … I found the cutest pink pillows…

…and a yummy smelling pink candle!

The little white pillow was kind of plain so I decided to add some cute pink pom-poms I made out of “furry” yarn. I just tacked them on so they can easily be taken off when I tire of the pink.

The pink pillows will go well with the little bit of Easter decorating I do!

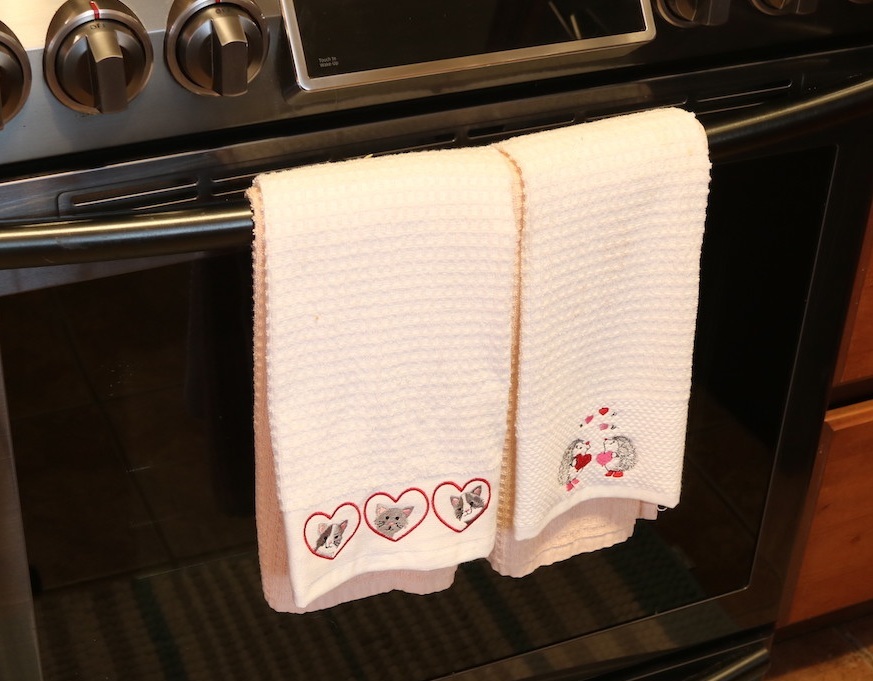
While digging around TJMaxx for pink pillows and candles I found a few other things I thought would be fun for the holiday….cute hedgehog mugs and fun little Valentine’s hand towels!

You don’t have to (or need to) spend a lot of money dressing your home for Valentine’s Day…but it is fun to infuse a little fun and color into an otherwise “drab” time of year!

Funny…I was wearing my pink tennis shoes and a pink vest when I was buying all this pink stuff…the check out lady remarked that I sure must like my pink…lol!

Turns out, I really do! It is so dreary and “wintery” outside and the pink just seems to brighten things up a bit!

I have some leftover pink velvet from the bench makeover…just enough for a few more pink pillows! Now if I can just being myself to sew them…eck!

Another antique chest makeover...

I promised last week to share all the dresser and chest of drawer makeovers I have been working on. This time of the year it is tough to get a lot of work done over several days because of the temperatures…fortunately this dresser was one I could work on inside.

Takes a little “strategizing” to figure out what I need to do outside on warm days and what can be done inside on cold days.

I knew I was going to paint the cabinet so I managed to get it (and a few others) Kilzed on a warm day. I try to avoid using Kilz inside because it is SUPER stinky…and I like to use the spray kilz on smaller pieces and that can’t be done inside. Sanding and wiping with tack cloth can be done when it is a tad colder so no biggy. I had to strip the drawers and top outside, but that can be done in the cold as well. I was able to bring everything inside to oil the drawers and top and paint the cabinet!

Again, this one didn’t need any major repairs…the only real boo-boo was one missing handle. This hardware was one of the most unique I had ever seen….not only the style but the fact that it was installed “vertically” vs. “horizontally.” Different…I like…so I was determined to use as much of the original hardware as I could.

I removed all the hardware. First I primed them with “metal primer” then I sprayed them with black lacquer.

Since one of the handles was missing and I knew there was NO way I was going to find a replacement, I decided to remove the handles on the top two drawers and replace them with knobs.

That meant the holes in the top drawers had to be puttied…and there is no good way to “disguise” putty holes without painting…but the wood on these drawer fronts was so pretty I really didn’t want to paint them!

The drawer on the right has been stripped…the drawer on the left has not. I just love how “clear and clean” the wood looks after removing the old finish (I used THIS process! Super easy!)

I decided the best way to disguise the puttied holes was to paint a stripe down the drawer fronts. I did this BEFORE applying the tung oil finish.

The stripe needed to be pristine…absolutely NO bleed through…and we all know how tough that is! I read a few tutorials on preventing that…some suggested using modge-podge…one suggested using caulk. I went with the caulk suggestion and it worked like a charm.

I used blue painter’s tape to tape off my stripes, then I ran clear LATEX (NOT silicone) caulk along the edges of the tape….

Then I used my finger to “mash” the caulk along the edge of the tape and wipe off any excess. WORKED LIKE A CHARM! Zero bleed through! I used clear caulk so any caulk that bleed through didn’t show!

I painted the stripes and cabinet. I used a grey latex I had on hand. I added Floetrol…ALWAYS add a paint additive…Penetrol for oil based paints, Floetrol for latex. I use a 4”foam roller and a high quality brush to minimize brush strokes and roller marks. And again, always apply 2-3 LIGHT coats to avoid drips and runs. I oiled the drawer fronts and top with 3 coats of tung oil finish (sand and tack between coats), drilled new holes for the knobs and reattached all the hardware and PRESTO!

Cute as a bug’s ear and super simple!

I just love bringing these pieces back to life!!!!