Another Drexel Accolade addition to the family....

It has actually been in the garage for months...but when I needed a large piece in my space at 410 Vintage Market and dug it out,I couldn't bring myself to turn loose.

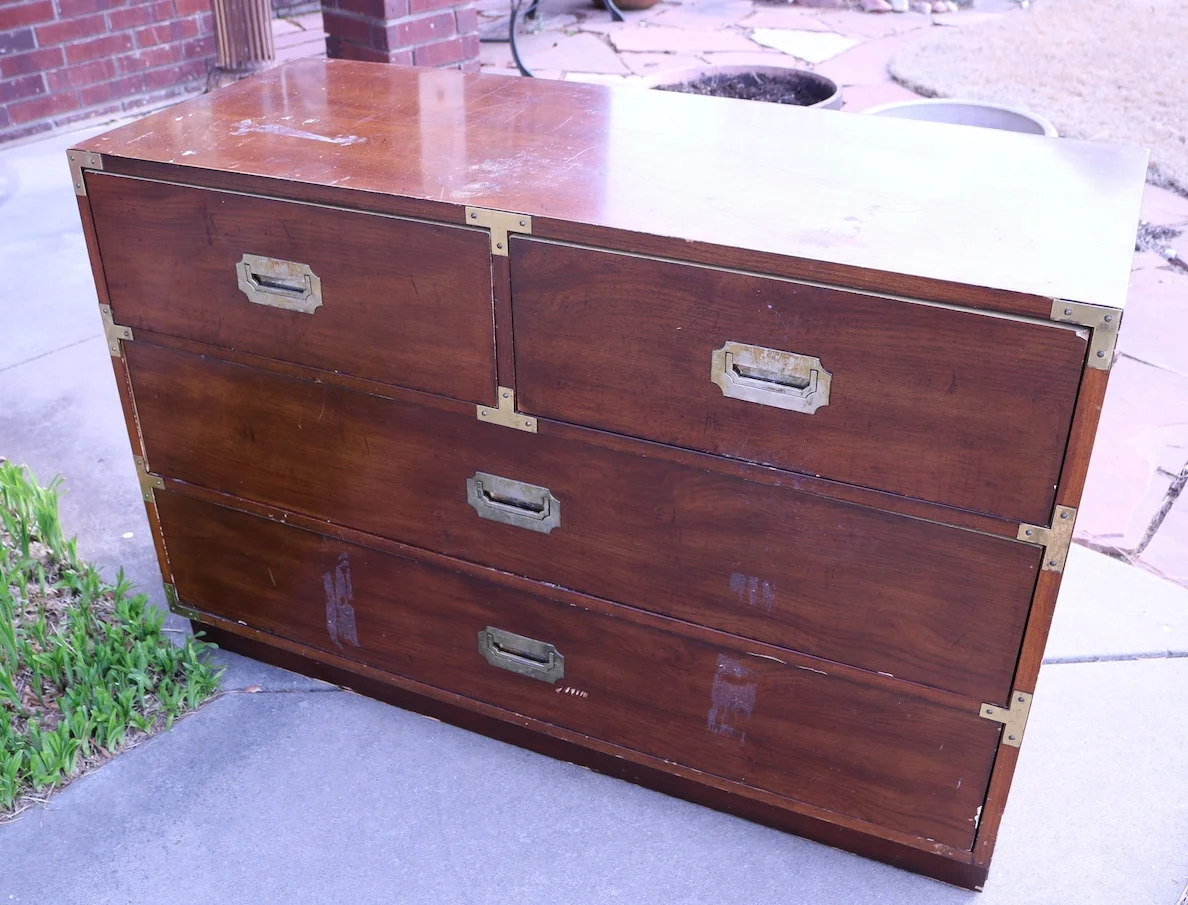
A Drexel Accolade dry bar/server. The top actually flips open.

It isn't the first piece I bought for resale that wormed it's way into my heart...no secret that I love mid century pieces.

But this Drexel Accolade bar is more of the "Hollywood Regency" style. Identical to this little Drexel side table I painted with a high gloss lacquer and love in my den....

There is a good chance I will paint it if I decide to keep it...for now I have shined up the brass hardware and will leave it at that.

Over the years I have snagged some amazing bargains at auctions and on Craigslist...a little DIY magic and they are stunning additions to any home!

This Drexel coffee table....

My growing collection of mid century dressers...

This one is Matt's...I just don't have any more room!

My never ending collection of side tables!

I started collecting Lane Acclaim tables years ago...I think between the kids and I we are up to 10! That doesn't include the 2 walnut Lane coffee tables and the end table I just refinished for Katie and Matt!

Chairs...

Odd little bookcases are always fun!

If you walked through my home you might think I lean more towards the "traditional" side of home decor at a glance...but all these pieces have blended in to created a cohesive "eclectic" style. This "style" of home decor allows me to infuse pieces I love without worrying too much about whether I am breaking a "decorating rule" for a specific style!

So...back to the amazing Drexel Accolade console/bar...

In my opinion, there is too much "wood tone" in this space...I absolutely love the wood grain on this piece but there has to be a good balance...it just doesn't feel "balanced."

So there is a good chance that IF it stays, it will get painted. Again, that is a big "if." I think I have had no less than 5 different buffets and hutches in this space at one time or another and I always end up moving them out and moving the table back against the wall...as I mentioned before my toes tend to find anything out of place, and since the dining table has been against the wall for the better part of 19 years, it may not work well in the middle of the dining room where it REALLY belongs!

We'll see...that is one of the beauties of learning to DIY furniture...you can buy it cheap, paint, upholstery or refinish it and promptly move it out if it doesn't suit your needs. Without the guilt of having to live with something you hate because you paid a fortune for!!!!

OR it can find a permanent home where it can shine for another lifetime!

Another campaign dresser makeover!

If I find one, I'm gonna buy it! A campaign dresser!

This one isn't a "vintage" campaign dresser...probably an imitation but sweet all the same! Well...it wasn't when I bought it....

Structurally it was in great shape but the finish was definitely lacking. A little KSTP (Kilz, sand, tack and paint...high gloss white lacquer), scrubbed up the brass hardware, and presto....

Again, this one wasn't a REAL vintage campaign dresser...but that didn't stop someone from buying it 1 hour after taking it to 410 Vintage.

This, my friends, is a REAL campaign dresser!!

I have already scrubbed up the brass hardware (no tricks there...Brasso, Brillo and A LOT of elbow grease.) I had to order a few replacement hardware pieces...holy cow those little brass doo-dads are expensive (found them on Etsy.) I sprayed on Kilz and sanded it down. Now I just need to apply a few coats of white lacquer...I can't wait! I will make sure I share it when it is done because I know it will be beautiful!

PORCH MINI-MAKEOVER....

Now that Matt has settled into his new house, we have started on a few little projects that make his home a little bit more...well..."him." (If you search "Matt's house" on this site you can will see several of the projects we have worked on!)

The back yard was a total disaster...lots of trees and years of neglect. I wish we had been smart enough to take before and after pictures of the side yard we have been working on. We added a few flower beds, raked up a truck load of rocks and brought in four truck loads of dirt and mulch. We seeded with fescue. I know it will probably burn up this summer but he was so excited to see the little guys sprouting! We dug up some of my neighbor's lirope and transplanted it in his new flower bed....repurposed the stones that were originally used as a "pad" to make a stepping stone path....a new little Japanese maple. I think it will all be wonderful when he is finished. My yard is an oasis...I have remind him it took 19 years of hard work to get it that way!

The back patio was a tad on the blah side. I did remember to snap a few pictures with my Iphone before we added just a few little touches.

We changed out the flush mount "boob" light for a pendant light...seriously, who puts a dinky flush mount light on a vaulted ceiling?

Threw down a pretty striped rug and added a potted palm and hanging basket. Nothing earth shatter but just a few simple touches to dress the space a bit!

He still needs to change out the seat cushions and eventually I would like to add a baker's rack or build a potting bench...maybe add some kind of wall decor on the wall! We could paint the wood railing but he is determined to eventually add a large deck off the patio so no sense in putting out the effort for the time being!

A few little touches here and there can add personality and style to a space.

It takes time to make a house your home... 

Just ANOTHER mid century dresser!

I can't help myself...when I see one, I just gotta have it!!!

A mid century bedroom set...Fashion Trend by Johnson Carper. I couldn't find a maker's mark anywhere on the set so I googled "mid century dresser" and found a picture of one like it!

(Look at the curves on this lady!)

I ended up having to buy the entire set at an auction...dresser, chest of drawers and full size bed frame. I sold the chest to off set the cost of the dresser...which is the piece I really wanted! I have a full size bed in  Mitchell's room so I might use the bed frame in there.

I decided not to strip and oil the drawers...they really are in excellent condition....I wiped them down with Restor-a-finish just to clean and brighten a bit. I painted the "box" (KSTP...high gloss white) only because the top was laminate... I did that with Matt's dresser and I love how it turned out!

My original plan was to put the new dresser in the guest room until I get this one back from Katie in a year or so...

But then I got to thinking...why would I hide a beautiful piece like this in a guest room? 

So I took the dresser out of my room and put it in the guest room and put the new one in my room!

LOVE!!!

The only other thing I have added to my "proper" guest room is this little rattan table (bought two and sold one) and the magazine rack from the living room. 

Again, you will not find AFFORDABLE new furniture that is built as well and with woods like walnut, teak, rosewood and mahogany! There is a reason vintage and antique furniture have managed to survive decades of use!

When I walk around my house and look at some of the beautiful vintage pieces I have collected I am amazed at just how little I have paid for them. Keep in mind MOST were in much need of a little care and attention but if you are willing to roll up your sleeves and do the work, you can create a home filled with beautiful pieces too! 

That is why I have this blog...to show you just how easy it can be!!!

Stop drooling and start doing!!!

Another mid century dresser...

I love vintage mid century furniture! Love it. The style is my absolute favorite to refinish and as I have said before, I try to infuse as many pieces as I can into each room. Beautiful wood...clean lines...sturdy as the day it was built!

These are just a few of the dressers and chests I have refinished over the years...

Here....

Here....

Thank goodness my kids have inherited my passion for this style of furniture...because when I found this awesome dresser and matching chest on Craigslist, Matt had no problem taking them off my hands (AFTER I had worked a little makeover magic on them!)

As you can see I couldn't wait to start stripping the old finish before I remembered to get the camera.  And the finish on this sucker...it was a booger! Usually my 1/2 and 1/2 mixture melts old finish right off! I dang near had to blast this stuff off...I finally had to break out the heavy duty stripper and break my cardinal rule against sanding veneer (DO NOT attempt to sand veneer unless you have some serious experience.)

The top is laminate so I decided to paint the cabinet and refinish the drawers and legs....

Stripped and oiled the drawer fronts and legs...KSTP the cabinet and tops...drum roll....

I usually add a piece of protective glass on painted dressers...just to be on the safe side!

I love these pieces...and they are perfect for Matt's new home. He is using the dresser in his master bedroom and the chest in his guest room! Because these pieces were so well built, they will last another life-time!

I have several projects in Matt's house to share! He has already started "projecting" and I try to sneak in and take pictures when I can! So stay tuned for a cute little breakfast table makeover and his updated brick fireplace.

The couch saga...

As I mentioned in this post, I custom ordered a new couch...in MAY...after MONTHS of shopping!!! (And we all know how much I hate to shop!) It was suppose to arrive in 8 weeks, but it took 10 weeks because my sales person went on vacation for two weeks and no one submitted the order. Thank goodness patience comes with age.

So it arrived in August....

I REALLY loved this couch...evident by the fact that I was patient AND I paid a small fortune for it.

HOWEVER, it had one major flaw. Because of the fabric choice, there were seams in the cushion and on the front of the couch.

One of the main reasons I special ordered an expensive couch was because I wanted the "seamless and clean" look of a single cushion. 

So for over two months I went back and forth with the store and the manufacturer. Fortunately for me, the digital "mock up" of the couch with that fabric did not show any seams...which gave me grounds to return it. But I didn't want to return it, I wanted THIS couch. It was super comfortable and the fabric was the perfect "creamy" with just a hint of "sparkle."

So I had the manufacturer send me several yards of the fabric to see if maybe I would like the fabric weave running "vertical" vs. "horizontal" which would eliminate the seams.

It only took two months to get the fabric sample. Only....

And then...hum...I just didn't know. So I went back to the store and looked at more fabric. Couldn't find one I liked so I decided to bite the bullet and have them rebuild the couch running the fabric "vertical," eliminating the seams. 

And then I waited...for over three weeks I waited THINKING the couch was on re-order. When I called to get an ETA, I was told they had not even ordered it yet.

This, my friends, is what they call "the end of my rope." 

Needless to say, I returned the couch and started over.

Which means I was not going to have a couch for the holidays. 

Several weeks before Thanksgiving I ordered a couch, "butt unfelt" (you know what I mean ladies!), that was suppose to "5 day quick ship.". While it did in fact ship in 5 days, it took the shipping company 3 weeks to deliver it. No, I did not have the couch for Thanksgiving.

The new couch? Well, I can't say I LOVE it...I love the style and have admired this couch many times online...it is the Younger "Michael" couch. A tad retro...single cushion, a tiny bit of tufting. The fabric selection was limited on the "quick ship" option so I picked a neutral fabric I could live with. Only the "standard" seat cushion was available in the "quick ship" and honestly, It's not as comfy as I would like. Again, I can't say I am madly in LOVE with the fabric and feel of the couch, but I certainly don't hate it. 

The upside is that it wasn't terribly expensive... and since I am not "in love" with this sofa, I won't feel terribly guilty about giving it to one of the kids in 5-6-7 years.

This week Christmas goes back to storage and then I tend to "hibernate" for a couple of months. It is just too cold to get much done. But I have already eyed a few projects I want to do inside...and I have a few projects I haven't shared. 

Happy New Year! Celebrate smart and stay safe!


Mirror, mirror, on the wall....

I gave up trying to come up with clever blog titles a loooong time ago, but I just couldn't resist!

Mirrors are the simplest way to add wall decor, light and depth to a room. In other words, if you have a small dark room, hang a mirror!

My master bedroom is a pretty large room and it gets tons of natural light but I am in the process of making a few changes. I have a really awesome antique mirror hanging out in my garage that may fit into the plan.

I use mirrors in just about every room of my house....

The living room (featured here)....

The den...

My home office....

And this fun little mirror hanging in a small corner of my room...

The change? Well, I am finally getting around to buying new chairs for my master bedroom. I originally intended to reupholster the chairs I have...

But as you can see, they are very large...and they are "matchy-matchy" which is something I am moving away from. Truth be told, I just don't like them any more!

While I was hunting for a new couch for the living room, I looked at a few chairs that might work in this space.

First, let me explain "this space." When the kids were younger, I added the den so we would have two living spaces. When they got a bit older (and louder), I added a large master suite with this awesome sitting area so we would have someplace to escape to.

Of course, now the kids are gone and we have this amazing sitting area in our bedroom and two living spaces. Um, no, we don't need all this space. Truthfully, we rarely use the sitting area in the master bedroom these days...but my oldest daughter really wants these two large club chairs...and well, it's just time to make a change!

So the hunt for the perfect chairs commenced.....

Two caught my eye, so this week I went back to the store and ordered them both....

This one is a leather recliner. A little bit of information about myself...I DO NOT do recliners. First, they are usually very bulky and unsightly. Second, I have an unfortunate history with recliners...hence, they seem to set off a form of PTSD. I don't really want to share, but suffice it to say, I swore there would never be a recliner in my home.

But I kind of like this one...it is very different from your typical barcalounger recliner and I really didn't find it the least bit offensive. It has a USB port and Brian thinks it is super comfy, so this will be "his" chair.

My chair is actually a "feed me a grape" kinda thing....

Perfect for those nights when my back won't let me lay in bed any longer or cold winter afternoons when I just want to curl up with a blanket and a good book!

I really didn't need an ottoman since Brian will have the recliner but I wanted to be able to stretch out.  This one fits the bill...and it is super comfy!

Which brings me to the mirror in the garage (see, I eventually get around to my point!) 

Months ago I bought a MCM dresser with a mirror. It had obviously been exposed to heat from a fire because the finish had a little bit of "bubbling" and it was covered in soot. I took off the mirror, cleaned up the dresser and sold it. 

These days dressers WITH mirrors just aren't the "in thing" so I kept the mirror and gave it a little makeover with the intent to sell it. The finish was damaged...and of course it was pretty "dark and dank."

I chalk painted it with an off-white paint and distressed it a bit. But I really didn't like the look of it...it just seemed too "white."

So I decided to give it a little "glaze" treatment with some stain. I wiped on pecan stain and then wiped it off. It gave the finish a nice "aged" look. After glazing the entire frame of the mirror, I sealed it with polycrylic and reattached the little medallions.

The mirror is "not my style" (again, whatever the heck that is! Eclectic?) and of course I will have to hang it higher...right now I just stuck it up where the old picture was to see if I MIGHT like it there...don't know. Truth is, I will have to wait until the new chairs are in place.

But my whole rambling point is this...you don't have to live with "dark and dank." Mirror frames can easily be painted. Even if the frame isn't quite "your style" a little paint can go a long way to making a simple cast off mirror a nice statement piece for your room! And trust me, if you have priced mirrors lately, you might want to rethink that thrift store gold framed mirror or that old dresser mirror!

Whether you paint it a bright, solid color or give it a little "aged look" treatment, mirrors are easy to change to fit any decor!

More painted furniture projects and how you can get perfect paint results!

I know I share a lot of painted furniture projects. There was a time when I was a "paint snob." If it is wood, no paint.

But I have learned in my resell business that paint is often the best way to "enhance" a piece and give it new life. 

We all have "that piece." The one mom gave us or maybe we bought at a thrift store or garage sale because we needed a dresser or side table. A maple dresser from the 60s or one of those fake wood "cherry" tables from the 80s. We still need it for the storage or even to fill a space and buying new just isn't an option.

As I have said before, life is too short to live with ugly furniture and even the ugliest piece can benefit from a little "makeover" 

Updating an old dresser or bedside table isn't difficult. Yes, Pinterest is filled with precious stenciled and glazed projects...and we all envy. But simple is easy and the impact can be huge.  I have shared hundreds over the years and every week I complete at least 2-3 pieces that often do not get shared...either I forget to take pictures or they sell so fast I think "why bother." 

So today, again, I'm going to share a few simple little projects and how to get the best results.

Mini makeovers that can make a huge impact in any room!

This campaign dresser had seen it's better days....

As you can see, it had been seriously abused. But even the ugliest piece has potential....

Not the best "after" picture, but I didn't think to take a picture before I took it into 410 Vintage so I snapped one with my phone...but you get the idea. (If you haven't been to 410, GO!)

It sold the day I took it in! These "upcycled" dressers are perfect for a bedroom or even a tv and storage cabinet in the living room.

You might have noticed one piece of the hardware was missing. I happened to have one of the pulls from this project so I used the same method to retrofit it. You don't have to do anything that complicated...most home improvement stores have tons of hardware options. All the hardware was solid brass so I cleaned it up with some Brasso, steel wool and elbow grease. The point...the hardware doesn't have to be all matchy-matchy. 

This little bedside table had seen it's better days!

A simple little makeover...paint and new hardware....new life....

This is a typical hard rock maple dresser you can find for next to nothing at thrift stores and garage sales...

Usually sturdy as the day they were built, but seriously ugly and dated!

They obviously can benefit from a little love and attention...nothing fancy just a little paint and hardware update....

An inexpensive little "fake wood" side table......

And AGAIN...

I liked the brass hardware on this one so I just cleaned it up!

Sooooo...what do all these projects have in common. 

KSTP...Kilz (or any good primer!), sand with 220 grit paper, wipe down with a tack cloth and paint.

The two dressers were painted with latex paint using a 4" foam roller and paint brush. I used spray paint on the two little side tables.

So, here are a few TIPS for getting the best results when painting furniture.

1) Always clean the piece of any dirt or debris. Just wipe it down with a damp cloth and make sure you get all the "ick" off! If the piece is super grungy, you might want to clean it with ammonia or wipe it down with mineral spirits! (If it has a lot of flaking paint, you can sand it down a bit or better yet, strip it using this process...just make sure the existing paint or finish is stable!)

2) Make repairs. DO NOT waste your time making it pretty if it needs repairs. And remember, glue and clamps are your friend!!!! If you don't know how to repair something, google it or email me. MOST furniture repairs aren't that difficult...but if you do it wrong (or not at all) you will be wasting your time making it pretty! 

3) Primer....always a must if you are going to paint with spray paint or latex or oil paint. I swear by the oil-based Kilz. If you want your paint to stick and not chip or peel, prime. For smaller projects I use spray Kilz. For larger projects I roll on Kilz with a 4" foam roller. Even if your paint says "all in one paint and primer"...use primer.

4) Sand smooth after the primer has thoroughly dried. A 220 grit paper should do the trick...FEEL the surface...if you can feel it, the paint won't hide it. 

5) Use tack cloth. Most tutorials will tell you to wipe the piece with a damp cloth. That won't cut it! Tack cloth will pick up the finest grains of dust and debris you can't see until you paint the piece! Use it!

6) If you are going to brush on latex or oil, use a quality brush AND TAKE CARE OF IT! I have brushes I have owned for years because I am religious about cleaning them thoroughly after use. And don't even think about using those cheap disposable brushes (chip brushes). They are great for many things, but not for getting a smooth paint finish on furniture!!!! 

7) ALWAYS use an additive....Floetrol for latex, Penetrol for oil based paints. 

8) Use quality paint. Especially spray paint. I know it is cheaper at discount stores but pay the extra few dollars and buy a quality spray paint at your home improvement store. Cheaper will NOT be better if it doesn't hold up to wear and tear! I do 2-3 light coats (spray or brush) rather than trying to get solid coverage with one coat...trust me when I say, there is NO paint on earth that will get good coverage with just one coat!

9) Cure time is important. Seriously, I know they style their pieces on those HGTV shows within hours of painting a piece of furniture. Just don't! Just because the paint feels dry to the touch DOES NOT mean it has cured. Latex...a few days...oil...a week. Give your paint time to cure or it is going to peel or chip if you try to use it right away! Put the piece in place and chill!

10) Spray vs. Brush/roller. For me, it all depends. I have learned that large flat areas are tough to get an even coat of paint on with spray paint...and of course there is the expense factor for large pieces. A dresser can take 2-3 cans of spray paint. So it really depends of the piece. Sometimes I will spray the drawer fronts of a dresser and roll the top and sides. 

11) Keep a little spare paint for chips and dings...if you use latex or oil, just put a few tablespoons in a little container and stick it in the back of the drawer...just in case! If you are using spray paint, keep a can with a little paint. Manufacturer's change paint colors and you might not be able to find that awesome color in the future. Keep spare paint in the house...not the garage or storage shed!

Regardless of whether you spray or roll/brush, you have to follow the first rules of KSTP....Kilz (primer), sand smooth, then tack....then paint!

If you follow these simple guidelines, you can update a dated piece with just a little time and effort. 

Again, life is too short to live with ugly furniture...

The hardware sets the tone...dresser makeovers!

We have been pretty busy this past month so I haven't been able to go to too many auctions. I was forced to scrounge around on Craigslist and online garage sale sites to find a few pieces to work on..

They did not disappoint!

As usual, I am drawn to the "nobody wants me because I am totally ugly" pieces of furniture.

I like different and unusual.

This chest and side table checked off all the boxes...kinda ugly and unusual.

The ugly part is pretty obvious but they do have nice "bones." Solid and sturdy!

The unusual part was the hardware. I love unusual hardware. Sometimes the hardware dictates what direction I go with a piece.

In this case the heavy black handles pushed me towards blue/gray. A friend asked me what paint color I used. Well, let's see...I had some blue, I threw in some black...too dark, so I added some white. 

So I have no idea what color it is....blue/gray!

They had some detailing so I decided to do a chalk paint and distress treatment. I usually save that for pieces that have good detailing that will "pop" when I distress it. 

Two coats of chalk paint, a little distressing and sealed with poly. The hardware just needed a little cleaning and it was good to go!!!

Hardware can be a booger when it is missing. I picked up a campaign dresser last week and the brass hardware was amazing. The only problem was it was missing one handle and they are next to impossible to replace.

I really wanted to stay "true" to the style of this dresser...a mid century campaign. But the old finish was pretty dark and dated. (did I take a before picture like a good blogger...um...no!) 

Very similar to this little side table I recently refinished. 

I decide to shine up the brass hardware and give the piece a sleek new look with gloss white paint.

The missing handle, however, posed a real challenge!

I knew I was going to have to scale back to one handle on each of the top drawers but I couldn't just patch little screw holes because the handles actually "inset" into the face of the drawer. 

The thickness of the hardware was 1/4"...so I bought 1/4" pieces of craft board....

....cut out a hole big enough for the hardware to sit in and then attached the boards to the face of the drawers with wood glue to cover the existing cut outs! 

KSTP (Kilz, sand, tack and paint!) treatment, reinstalled the spiffed up hardware and.....

Perfect! Obviously someone else thought it was perfect because it sold the day I took it in!

Until next week....

Drexel Accolade Nightstand makeover....

I cringe when I even think about painting any MCM piece but occasionally I bite the bullet and paint. Painted this MCM dresser and chest and have never regretted it...yet.

These little Drexel Accolade campaign "nightstands" are described as "MCM" but my research shows they are from the 1980s...so at best they are "vintage." (I cringe even more describing anything from the 80s as "vintage" since I graduated from college in the 80s!)

These little tables vary in "value." Originally my intent was to sell both as-is. But one had some serious "splash marks" all over it and as much as I tried I could not get it off. My only option was to completely strip and refinish the piece...or paint. 

Since I am AGAIN working on the final stages of my den makeover, I decided to paint the one with the serious flaws and use it as a side table. I started to strip and stain it, but I really need a painted piece rather than stained....just my preference. I believe it is important to have a balance of paint and natural wood in any decor and in this case the scales tipped toward paint.

(I will remind you to use extreme caution when painting "vintage" or "antique" pieces...do your research and know what you have FIRST! Make an informed decision before you refinish or paint...you don't want to find out later that you slathered paint on a 1796 colonial side table or spray painted a Hans Wegner chair...just watch "Antique Roadshow")

You can use ketchup or lemon based cleaners to clean brass. Just Google!

The brass hardware on these little tables needed some serious attention!

One interesting tidbit I ran across was how to determine if you have solid brass or brass plated...a magnet...magnets won't stick to solid brass...if it sticks, it is plated...interesting. Mine are solid so that determined how "aggressive" I could be cleaning them.

I'm not sure if a "clear coat" was sprayed on this hardware or age had taken a toll (maybe both), but even my 1/2 and 1/2 mixture didn't cut it. In the end I used a toothbrush, 0000 steal wool, a heavy duty brass cleaner and a ton of elbow grease.

Then I gave the entire piece a little KSTP treatment...Kilz, sand, tack cloth and then paint. 

I really like the look of "high gloss" so I went with a high gloss lacquer white...I think the brass really pops against the gloss white and hopefully it will look good with whatever couch I finally set my sights on!

One word of warning I hope all will take seriously...give paint time to "cure." Nothing is more frustrating than spending time and effort making a piece pretty with paint, only to mess it up by putting doo-dads on it too soon! Cure time IS important!!!! 

I cleaned up the other and it may be sold...I may hang onto it for the time being to see if I can use it in the den...but I am not really into "matchy-matchy" so I may not use it...who knows. And besides, that brass is a booger to shine up so I'm not really looking forward to doing that again any time soon!!!

You may notice I have a mix of MCM and "traditional" in my den...and that is honestly how I would describe "my style"....eclectic or maybe "transitional"...a little of this and a little of that. It allows me to add elements I love without having to worry too much about the actual "style" of each piece. 

Until next week....

MCM dresser makeover AGAIN!

I featured my personal dresser make over here!

I really love this dresser but as I mentioned in the original post, I have always regretted painting the drawer fronts. They have a little slant and as you can see in the linked post, they have a little "inlay" detail! Looking back, I wish I had stripped the drawer fronts, oiled them and just painted the cabinet and top....kind of like what I did with this dresser!

I guess I could have rolled up my sleeves and taken on the task of stripping the fronts...but honestly, you can't go back and easily undo what has been done...or can you?

If you find the exact same dresser, YES YOU CAN!!!

I happen to be driving down the street this past weekend and spotted a dresser and chest of drawers sitting out in a driveway. It just so happens they were the EXACT same style I have. I couldn't stop fast enough (annoying to the person behind me since I was hauling my 14' trailer) but was disappointed when told someone was coming to pick them up later that evening. I asked them to call me if they weren't picked up...that is when I found out they were GIVING them away...would I be willing to PAY for them? YOU BET YOUR BAZOOKA!!!! I couldn't get them in my truck fast enough. Do I feel a tad guilty that someone showed up later that evening to pick up their free furniture...only to find it gone...naaaaaa...okay just a tad.

So this is what the dresser looks like in it's original glory! A "Ward Furniture Manufacturing" dresser. It is identical to my blue one before I gave it a little makeover.

Hardly a scratch on it and the veneer was all intact and in good condition. I am always amazed when a 50 year old piece of furniture is in such amazing condition...I wish this 53 year old had faired as well!

I removed all the drawers and stripped the fronts using this process...never fails and a pretty quick process! Even though the finish was near perfect, old finishes "muddy" and "amber" over time and just removing the old finish really brings out the beauty of the piece!

TIP! When you remove drawers from a chest or dresser, make sure you label each drawer (I mark them on the underside with a pencil!) 

The drawers may look identical, but truth is they may not fit properly in a different place...age and wear can make drawers "stick" if they aren't put back where they were originally! 

I gave the cabinet a little KSTP treatment...Kilz, sand, tack and paint! I applied 4 coats of tung oil finish to the drawer fronts and legs...sanding (with 0000 steel wool) and tack between each coat. 

I. LOVE. WALNUT. AND I. LOVE. MID CENTURY! 

And now I. LOVE. THIS. DRESSER! 

I didn't "dislike" the original dresser, but again, I did regret that I didn't restore the drawer fronts. Now...perfect! 

As much as I would love to keep the matching chest, it will be sold. Can't keep every piece and since these aren't "valuable" MCM pieces, I don't feel too bad letting it go!  

Painting dressers today so until next week....