Picking a wall paint color...

Picking a new wall color is one of the most difficult things I have to do when making over a room.

Why? Because when I pick a paint color, I LOVE it and it is difficult to change! I have loved the color of my walls since I picked it out 18 years ago. I have repainted once in 18 years, and I went with the exact same color...SW Creme! 

Last year before we went to Colorado, I decided it was time to change my wall paint color....I was actually going to hire a painter to come in and paint while we were on vacation. Did it happen? NOPE! 

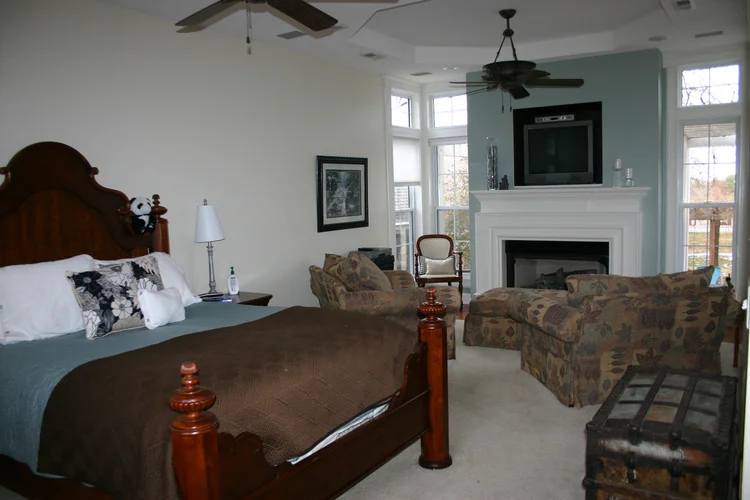
This year before we left, the new bedroom chairs arrived. 

"Grey" chairs...."creme" walls. Hum?! 

So when we came home from vacation this year I set out to find the perfect wall color for my master bedroom and I did what I always do...I started "surfing the web."

Pinterest, blogs, Houzz. The problem is one many encounter... the head-banging, nail-biting quest to pull all the elements of a room together with the wall paint.

I would never begin to tell someone what color to paint their walls. I just think there are too many elements to take into consideration. In my case, I have tons of natural light I love, I have an accent wall color I love, chairs I love, accent colors I love. All I need is the perfect wall color to pull it together!

OH THE MADNESS! 

So I did what I always do when I am searching for the perfect paint color. First, I picked out a few "greys" I thought I might like and painted big splotches on two different walls in the room. SW Repose Grey, Useful Grey and Eider White....I even mixed the Repose and Eider and painted that on as well. They have been on the wall for about a week now so I can look at them in all types of light! 

I also painted a few boards and propped them up on the mantel against the accent wall...just to get another perspective.

IMO, this is the only way to find the perfect wall color.

But I was still undecided...wasn't really loving any of them and was just about to hang it up and repaint the entire room the original creme.

Then I went back to the original color pallet I fell in love with when I first started this little makeover...

The white is in the bedding, throw pillows and trim color...the blue/green is on the accent wall, the frosted berry in pillows, blankets and rugs and the new chairs are definitely on the grey side. 

So what about the last color (second from the left)? 

When I look at the greys I picked out the Useful Grey seems to fall a little more in line with the color pallet but I keep picking up a hint of green. The Repose Grey just seems to be...well...grey. Very grey. I just don't think I would be happy with it even though it seems to be a very popular color right now. The Eider white is just too white. 

Then I looked at the SW color chart I have and noticed the color one shade above Useful Grey...Nuance...a tad lighter....I kind of like it. And then there is the color of my office, Alabaster. I like that color too. 

Cruuuuuud. Now I have to go buy more samples.

The miracle chairs...

Even after years of proving I can turn just about any "trash" into a little "treasure," I think Brian still raises an eyebrow from time to time.

Such was the case with these chairs....

We went to a farm auction and these chairs had been tossed into an old barn, only to see the light of day when the auctioneer dug them out and sold them...to me!

What would possess me? They were literally caked with nastiness and two were in pieces. But I saw the potential (and of course the old mud dauber nests and spiders and bugs!). 

Rarely will I take a hose to a piece of wood furniture...but I had no choice. Even then I had to scrub them with a strong detergent and steel wool.

Then I pulled nails, scraped old glue, cut out broken spindles and removed splintered veneer.

Then I had to clamp and glue everything back together. One chair was missing a side apron so I cut a new one and secured it in place with glue and my Kreg jig! 

My original plan was to prime and paint them. They still had a few rough spots and I knew I wouldn't get a pristine finish I would be happy with so I decided to do a chalk paint and distress finish on them! Always a good choice for a piece that has a few "boo-boos!" 

I think the boo-boos and the distressed finish give the chairs "aged character." After recovering the seats on the two Duncan Phyfe style chairs and making a new seat for the other, I think they turned out pretty sweet.

My plan is to stage them with this trestle table I will be taking into 410 Vintage this week, just in time for the holidays! 

Just in time for Brian and me to take our annual trek to Colorado! I can't wait...two days of fly fishing, several days of sight-seeing and maybe even a day of gambling in Central City! The forecast shows the temps in the 50s and 60s so I will be packing my coat and Uggs! One thing is for sure, I always come home recharged and ready to enjoy my favorite season

I made a few changes to my fall decorating this year...one being these little pumpkins...

I added a few silk sunflowers, a fall garland, fall picks and deer antlers (yes, my kids killed them....ick!).

Not sure I am loving this little vignette but I have a few more months to make changes and additions!


Pumpkin cutting board tutorial....

I still haven't ventured to the storage building to retrieve my fall decor. I'm just not ready to go all out on the fall decorating.

But as I mentioned here, it is never too early to start a few little "fall projects!" 

Over the years, I have shared several little cutting board makeovers....here, here and here! I never use wood cutting boards for food prep, but I like the warmth and whimsey they add to the kitchen!

Super simple little makeovers for old boards that have seen their better days! 

I've kept my eye out for one shaped like a pumpkin but so far no luck...so I decided to make one.

I wanted to make one with walnut or mahogany but I didn't have any scrap pieces big enough. I had an old pine fence picket floating around my garage...I thought I might make a little sign with it but I decided it would be perfect for this project.

The board would be replacing the pineapple shaped board for the season, so I measured that board to determine the size of the pumpkin.

I cut it into three pieces a smidge longer than the height of the finished pumpkin...around 12".

I glued the edges, clamped the three pieces together and let them dry overnight.

I made a paper template of the pumpkin and traced it onto the board....

I used my jig saw to cut out the shape. Unfortunately the glued edges didn't hold and I ended up having to reglue the edges and then glue and staple little "cleats" across the back!

Since I don't intend to use this as a REAL cutting board, no biggy!

After REassembling the boards, I sanded the top and edges with my little palm sander.

As I have shared before, I always use Watco butcher block oil on my cutting boards. Again, I don't intend to actually use this board, but if you do, this product is food safe! Truth is, I just like the way this oil brings out the color and grain of the wood! 

And it did not disappoint! A nice little "surprise" was the "orangish" patina of the wood when I applied the oil...perfect for the season!

This would be a simple little project to do in any scale...maybe a larger wood pumpkin or even a scarecrow cutout for your porch. 

Last year I used an old board to make this little welcome sign...

It's amazing the things you can do with old scrap wood! 

NOW I'm kinda in the mood to start decorating for fall. 

Master bedroom makeover Part ?

The chairs have arrived. One element of the master bedroom plan I started several years ago!

The original "plan" for this room was to eventually recover the existing club chairs.

But I decided they were just too big and I'm over the whole "matchy-matchy" thing. I wanted smaller and different...and that is exactly what I got!

So the master bedroom "remodel" that started three years ago when I painted the furniture and continued when we installed the laminate flooring, is still on going. 

I still love the original inspiration colors I chose....

The soothing soft blue, the pop of frosted berry...the two new chairs bring in the soft grey element. Unfortunately that makes the soft off white of the walls appear very yellow.

So NOW I need to paint the walls. I noticed too that I have never painted the fireplace surround with the new whiter trim paint I am now using throughout the house. And the 2001 grossly expensive paddle fans? Not feeling it, so those may get changed out....something not in the original plan.

The two empty frames on the wall? Originally they were dark wood and were hanging vertically in my living room with pictures of my kids in them.

They have been sitting in my garage since I added the new mirror over three years ago.

A little KSTP treatment and they are ready for a new life...as a frame for...? Honestly, I haven't decided...maybe pretty landscape water colors or mirrors. I can't decide. That is one thing I have never been able to do in this room...wall decor! I still have massive empty wall space!

As I mentioned here three years ago, I knew I would need to add length to the curtains...or ignore it. 


I share this only so you will understand that a "room transformation" doesn't always happen over night. Sometimes it can take YEARS and in that time frame, your wants and tastes and desires may change. 

One or two elements at a time...slow and steady...you don't have to do it all at once!

Updating fall pumpkins!

It is no secret that fall is my absolute favorite time of the year! I love the Christmas season, but I adore fall and by the time I finish my fall decorating, it pretty much looks like fall puked in my house!

As I mentioned (here) several years ago, I have considered transitioning to the "farmhouse" style fall decor...whites, blues, grays....more of a neutral pallet. But I just can't seem to move away from the "traditional" colors of fall....reds, oranges, yellow. 

After years of exposure, a few of my pumpkins have started to fade and look pretty tired and worn. These pumpkins sit on top of the bookcase in the front room window. 

I know...this picture is crud! But the glare is brutal especially with my limited photography skills!

Pretty gnarly looking!

It is way too early to start decorating for fall but this year I decided to make a significant change to the front window decor.

The little scarecrows were sold in a garage sale last year. The pumpkins could probably be tossed, but I decided to give them a little facelift and start SLOWLY making a move to a neutral color pallet for the season. Okay, so I'm probably not going to give up on my reds and oranges but it won't hurt me to change a few vignettes. 

This is a prime example of "oh, what the heck"....they were toast so what is the worst that can happen...I don't like them and I toss them anyway! 

First, I had to make a trip to the storage building and dig out the box with these ratty little pumpkins.

They are not ceramic or wood like these...just cheap little foam pumpkins. (I use to store all my seasonal decor in the attic but last year we rented a storage building so we didn't have to kill ourselves climbing up and down the attic stairs.)

Next, paint colors. I decided to go with off-white, teal and grey. 

I couldn't find a gray spray paint I liked so I bought one of the little sample pots of light gray.

I removed all the little stems and stuck them in the styrofoam.

Most of the stems had come loose and needed to be hot glued anyway, so no biggy to remove them. I painted them gray, then "dry brushed" some brown on them to give them a "stem look." 

I split them up based on size and painted them the three different colors. 

After paint, I decided they still needed a little "something." On the teal, I dry brushed the grey in the grooves of the pumpkin, on the grey I used white and on the off-white I used the brown. I just watered down the accent colors, lightly brushed it on, then randomly wiped it off with a damp cloth. The accent colors gave the pumpkins some depth and a more realistic look. 

I used hot glue to reattach the little stems.

Cute as a bugs ear and they will be perfect for decorating the window this year. I may add some silk hydrangea blooms! I'll try to remember to share when I get them all staged and pretty!

Pinterest is chalked full of fall vignette inspiration so I have no doubt I will be able to pull together a cute vignette using these little guys!

Before you toss a ratty old decor piece think about giving it a simple little facelift.

But again, it is still too early for fall! I usually decorate right before we make our annual trek to Colorado but this year we leave a little earlier so I may wait until we get home. Who know...the mood may strike the first time I pull on my Uggs! 

But when the mood does strike, these little guys will be ready to go! It may be too early to decorate but it is never too early to start preparing!!!

Mirror, mirror, on the wall....

I gave up trying to come up with clever blog titles a loooong time ago, but I just couldn't resist!

Mirrors are the simplest way to add wall decor, light and depth to a room. In other words, if you have a small dark room, hang a mirror!

My master bedroom is a pretty large room and it gets tons of natural light but I am in the process of making a few changes. I have a really awesome antique mirror hanging out in my garage that may fit into the plan.

I use mirrors in just about every room of my house....

The living room (featured here)....

The den...

My home office....

And this fun little mirror hanging in a small corner of my room...

The change? Well, I am finally getting around to buying new chairs for my master bedroom. I originally intended to reupholster the chairs I have...

But as you can see, they are very large...and they are "matchy-matchy" which is something I am moving away from. Truth be told, I just don't like them any more!

While I was hunting for a new couch for the living room, I looked at a few chairs that might work in this space.

First, let me explain "this space." When the kids were younger, I added the den so we would have two living spaces. When they got a bit older (and louder), I added a large master suite with this awesome sitting area so we would have someplace to escape to.

Of course, now the kids are gone and we have this amazing sitting area in our bedroom and two living spaces. Um, no, we don't need all this space. Truthfully, we rarely use the sitting area in the master bedroom these days...but my oldest daughter really wants these two large club chairs...and well, it's just time to make a change!

So the hunt for the perfect chairs commenced.....

Two caught my eye, so this week I went back to the store and ordered them both....

This one is a leather recliner. A little bit of information about myself...I DO NOT do recliners. First, they are usually very bulky and unsightly. Second, I have an unfortunate history with recliners...hence, they seem to set off a form of PTSD. I don't really want to share, but suffice it to say, I swore there would never be a recliner in my home.

But I kind of like this one...it is very different from your typical barcalounger recliner and I really didn't find it the least bit offensive. It has a USB port and Brian thinks it is super comfy, so this will be "his" chair.

My chair is actually a "feed me a grape" kinda thing....

Perfect for those nights when my back won't let me lay in bed any longer or cold winter afternoons when I just want to curl up with a blanket and a good book!

I really didn't need an ottoman since Brian will have the recliner but I wanted to be able to stretch out.  This one fits the bill...and it is super comfy!

Which brings me to the mirror in the garage (see, I eventually get around to my point!) 

Months ago I bought a MCM dresser with a mirror. It had obviously been exposed to heat from a fire because the finish had a little bit of "bubbling" and it was covered in soot. I took off the mirror, cleaned up the dresser and sold it. 

These days dressers WITH mirrors just aren't the "in thing" so I kept the mirror and gave it a little makeover with the intent to sell it. The finish was damaged...and of course it was pretty "dark and dank."

I chalk painted it with an off-white paint and distressed it a bit. But I really didn't like the look of it...it just seemed too "white."

So I decided to give it a little "glaze" treatment with some stain. I wiped on pecan stain and then wiped it off. It gave the finish a nice "aged" look. After glazing the entire frame of the mirror, I sealed it with polycrylic and reattached the little medallions.

The mirror is "not my style" (again, whatever the heck that is! Eclectic?) and of course I will have to hang it higher...right now I just stuck it up where the old picture was to see if I MIGHT like it there...don't know. Truth is, I will have to wait until the new chairs are in place.

But my whole rambling point is this...you don't have to live with "dark and dank." Mirror frames can easily be painted. Even if the frame isn't quite "your style" a little paint can go a long way to making a simple cast off mirror a nice statement piece for your room! And trust me, if you have priced mirrors lately, you might want to rethink that thrift store gold framed mirror or that old dresser mirror!

Whether you paint it a bright, solid color or give it a little "aged look" treatment, mirrors are easy to change to fit any decor!

More painted furniture projects and how you can get perfect paint results!

I know I share a lot of painted furniture projects. There was a time when I was a "paint snob." If it is wood, no paint.

But I have learned in my resell business that paint is often the best way to "enhance" a piece and give it new life. 

We all have "that piece." The one mom gave us or maybe we bought at a thrift store or garage sale because we needed a dresser or side table. A maple dresser from the 60s or one of those fake wood "cherry" tables from the 80s. We still need it for the storage or even to fill a space and buying new just isn't an option.

As I have said before, life is too short to live with ugly furniture and even the ugliest piece can benefit from a little "makeover" 

Updating an old dresser or bedside table isn't difficult. Yes, Pinterest is filled with precious stenciled and glazed projects...and we all envy. But simple is easy and the impact can be huge.  I have shared hundreds over the years and every week I complete at least 2-3 pieces that often do not get shared...either I forget to take pictures or they sell so fast I think "why bother." 

So today, again, I'm going to share a few simple little projects and how to get the best results.

Mini makeovers that can make a huge impact in any room!

This campaign dresser had seen it's better days....

As you can see, it had been seriously abused. But even the ugliest piece has potential....

Not the best "after" picture, but I didn't think to take a picture before I took it into 410 Vintage so I snapped one with my phone...but you get the idea. (If you haven't been to 410, GO!)

It sold the day I took it in! These "upcycled" dressers are perfect for a bedroom or even a tv and storage cabinet in the living room.

You might have noticed one piece of the hardware was missing. I happened to have one of the pulls from this project so I used the same method to retrofit it. You don't have to do anything that complicated...most home improvement stores have tons of hardware options. All the hardware was solid brass so I cleaned it up with some Brasso, steel wool and elbow grease. The point...the hardware doesn't have to be all matchy-matchy. 

This little bedside table had seen it's better days!

A simple little makeover...paint and new hardware....new life....

This is a typical hard rock maple dresser you can find for next to nothing at thrift stores and garage sales...

Usually sturdy as the day they were built, but seriously ugly and dated!

They obviously can benefit from a little love and attention...nothing fancy just a little paint and hardware update....

An inexpensive little "fake wood" side table......

And AGAIN...

I liked the brass hardware on this one so I just cleaned it up!

Sooooo...what do all these projects have in common. 

KSTP...Kilz (or any good primer!), sand with 220 grit paper, wipe down with a tack cloth and paint.

The two dressers were painted with latex paint using a 4" foam roller and paint brush. I used spray paint on the two little side tables.

So, here are a few TIPS for getting the best results when painting furniture.

1) Always clean the piece of any dirt or debris. Just wipe it down with a damp cloth and make sure you get all the "ick" off! If the piece is super grungy, you might want to clean it with ammonia or wipe it down with mineral spirits! (If it has a lot of flaking paint, you can sand it down a bit or better yet, strip it using this process...just make sure the existing paint or finish is stable!)

2) Make repairs. DO NOT waste your time making it pretty if it needs repairs. And remember, glue and clamps are your friend!!!! If you don't know how to repair something, google it or email me. MOST furniture repairs aren't that difficult...but if you do it wrong (or not at all) you will be wasting your time making it pretty! 

3) Primer....always a must if you are going to paint with spray paint or latex or oil paint. I swear by the oil-based Kilz. If you want your paint to stick and not chip or peel, prime. For smaller projects I use spray Kilz. For larger projects I roll on Kilz with a 4" foam roller. Even if your paint says "all in one paint and primer"...use primer.

4) Sand smooth after the primer has thoroughly dried. A 220 grit paper should do the trick...FEEL the surface...if you can feel it, the paint won't hide it. 

5) Use tack cloth. Most tutorials will tell you to wipe the piece with a damp cloth. That won't cut it! Tack cloth will pick up the finest grains of dust and debris you can't see until you paint the piece! Use it!

6) If you are going to brush on latex or oil, use a quality brush AND TAKE CARE OF IT! I have brushes I have owned for years because I am religious about cleaning them thoroughly after use. And don't even think about using those cheap disposable brushes (chip brushes). They are great for many things, but not for getting a smooth paint finish on furniture!!!! 

7) ALWAYS use an additive....Floetrol for latex, Penetrol for oil based paints. 

8) Use quality paint. Especially spray paint. I know it is cheaper at discount stores but pay the extra few dollars and buy a quality spray paint at your home improvement store. Cheaper will NOT be better if it doesn't hold up to wear and tear! I do 2-3 light coats (spray or brush) rather than trying to get solid coverage with one coat...trust me when I say, there is NO paint on earth that will get good coverage with just one coat!

9) Cure time is important. Seriously, I know they style their pieces on those HGTV shows within hours of painting a piece of furniture. Just don't! Just because the paint feels dry to the touch DOES NOT mean it has cured. Latex...a few days...oil...a week. Give your paint time to cure or it is going to peel or chip if you try to use it right away! Put the piece in place and chill!

10) Spray vs. Brush/roller. For me, it all depends. I have learned that large flat areas are tough to get an even coat of paint on with spray paint...and of course there is the expense factor for large pieces. A dresser can take 2-3 cans of spray paint. So it really depends of the piece. Sometimes I will spray the drawer fronts of a dresser and roll the top and sides. 

11) Keep a little spare paint for chips and dings...if you use latex or oil, just put a few tablespoons in a little container and stick it in the back of the drawer...just in case! If you are using spray paint, keep a can with a little paint. Manufacturer's change paint colors and you might not be able to find that awesome color in the future. Keep spare paint in the house...not the garage or storage shed!

Regardless of whether you spray or roll/brush, you have to follow the first rules of KSTP....Kilz (primer), sand smooth, then tack....then paint!

If you follow these simple guidelines, you can update a dated piece with just a little time and effort. 

Again, life is too short to live with ugly furniture...

New "Home Tour" updates...

The new couch has finally arrived...and no, it is not right. But that is whole nuther story!

In spite of the couch issues, I finally got around to updating a few of my "Home Tour" pictures...I honestly didn't realize how out dated the pictures where. 

You can check out a few of the changes here....

Change is a coming...again

As much as I like to think everything stays the same around here...things do change!

Change came when Brian and I combined households. One of the many additions when he took up residence was his very large and very brown leather couch....

I featured the club chair makeover here

BB (before Brian) I had a light and bright couch....this couch went to the den....

(My daughter now has this living room...the couch, the leather chair and the rug!)

...after I gave away the hulking "mustard" couch! 

The simple yellow couch went to my daughter's so for now the big brown couch has moved to the den  ....

...to make room for the NEW couch I ordered two months ago...

...and as you can see, it has still not arrived.

There was a time when I probably would have ordered off the floor because I was too impatient to wait. But wait I have...and waited and waited and waited. Fortunately, it is due to be delivered today.

The biggest problem I have right now is the "matchy matchy" of the big brown leather couch and big brown leather chair in the den...

....so the new couch may go to the den and the big brown leather couch may go back to the living room. 

Who knows...all I know is I am grateful for furniture movers and Brian's strong back and endless patience!

One disadvantage (or advantage, depending on your perspective) to going to auctions and having a resell outlet is the never ending supply of relatively affordable furniture. This Duncan Phyfe table was a fixture in my dining room for 15 years....

Then I found this really nifty antique table and shared how I refinished it here....

Then I found a really nifty trestle table and shared it's little makeover here....

I held onto this table for a time only because I thought I might follow the "farmhouse fad" and try to infuse a little in my dining area. But truth is, it always seemed a tad big...and honestly, it just isn't "my style." 

A few weeks ago I snagged this cute little antique draw leaf table at an auction....

Not sure I am in love with it, but it suits the need for a smaller table nested against the wall and it can be expanded once a year for Thanksgiving dinner. 

So, change is coming...when the couch gets here. It has been over two months since I ordered it so I hope I still LOVE it when it is delivered. Couches are one of those things I really need to love...because they are big and they are expensive and for me they are the anchor for the room. Rugs, pillows, tables and wall decor can easily be changed out to completely change the feel of a room...couches, not so much! 

The hardware sets the tone...dresser makeovers!

We have been pretty busy this past month so I haven't been able to go to too many auctions. I was forced to scrounge around on Craigslist and online garage sale sites to find a few pieces to work on..

They did not disappoint!

As usual, I am drawn to the "nobody wants me because I am totally ugly" pieces of furniture.

I like different and unusual.

This chest and side table checked off all the boxes...kinda ugly and unusual.

The ugly part is pretty obvious but they do have nice "bones." Solid and sturdy!

The unusual part was the hardware. I love unusual hardware. Sometimes the hardware dictates what direction I go with a piece.

In this case the heavy black handles pushed me towards blue/gray. A friend asked me what paint color I used. Well, let's see...I had some blue, I threw in some black...too dark, so I added some white. 

So I have no idea what color it is....blue/gray!

They had some detailing so I decided to do a chalk paint and distress treatment. I usually save that for pieces that have good detailing that will "pop" when I distress it. 

Two coats of chalk paint, a little distressing and sealed with poly. The hardware just needed a little cleaning and it was good to go!!!

Hardware can be a booger when it is missing. I picked up a campaign dresser last week and the brass hardware was amazing. The only problem was it was missing one handle and they are next to impossible to replace.

I really wanted to stay "true" to the style of this dresser...a mid century campaign. But the old finish was pretty dark and dated. (did I take a before picture like a good blogger...um...no!) 

Very similar to this little side table I recently refinished. 

I decide to shine up the brass hardware and give the piece a sleek new look with gloss white paint.

The missing handle, however, posed a real challenge!

I knew I was going to have to scale back to one handle on each of the top drawers but I couldn't just patch little screw holes because the handles actually "inset" into the face of the drawer. 

The thickness of the hardware was 1/4"...so I bought 1/4" pieces of craft board....

....cut out a hole big enough for the hardware to sit in and then attached the boards to the face of the drawers with wood glue to cover the existing cut outs! 

KSTP (Kilz, sand, tack and paint!) treatment, reinstalled the spiffed up hardware and.....

Perfect! Obviously someone else thought it was perfect because it sold the day I took it in!

Until next week....