HAPPY BIRTHDAY KATIE!!!! Tales of a teenagers room...

First, I want to say happy birthday to my baby girl! Seventeen...wow! I can't believe you are 17! 

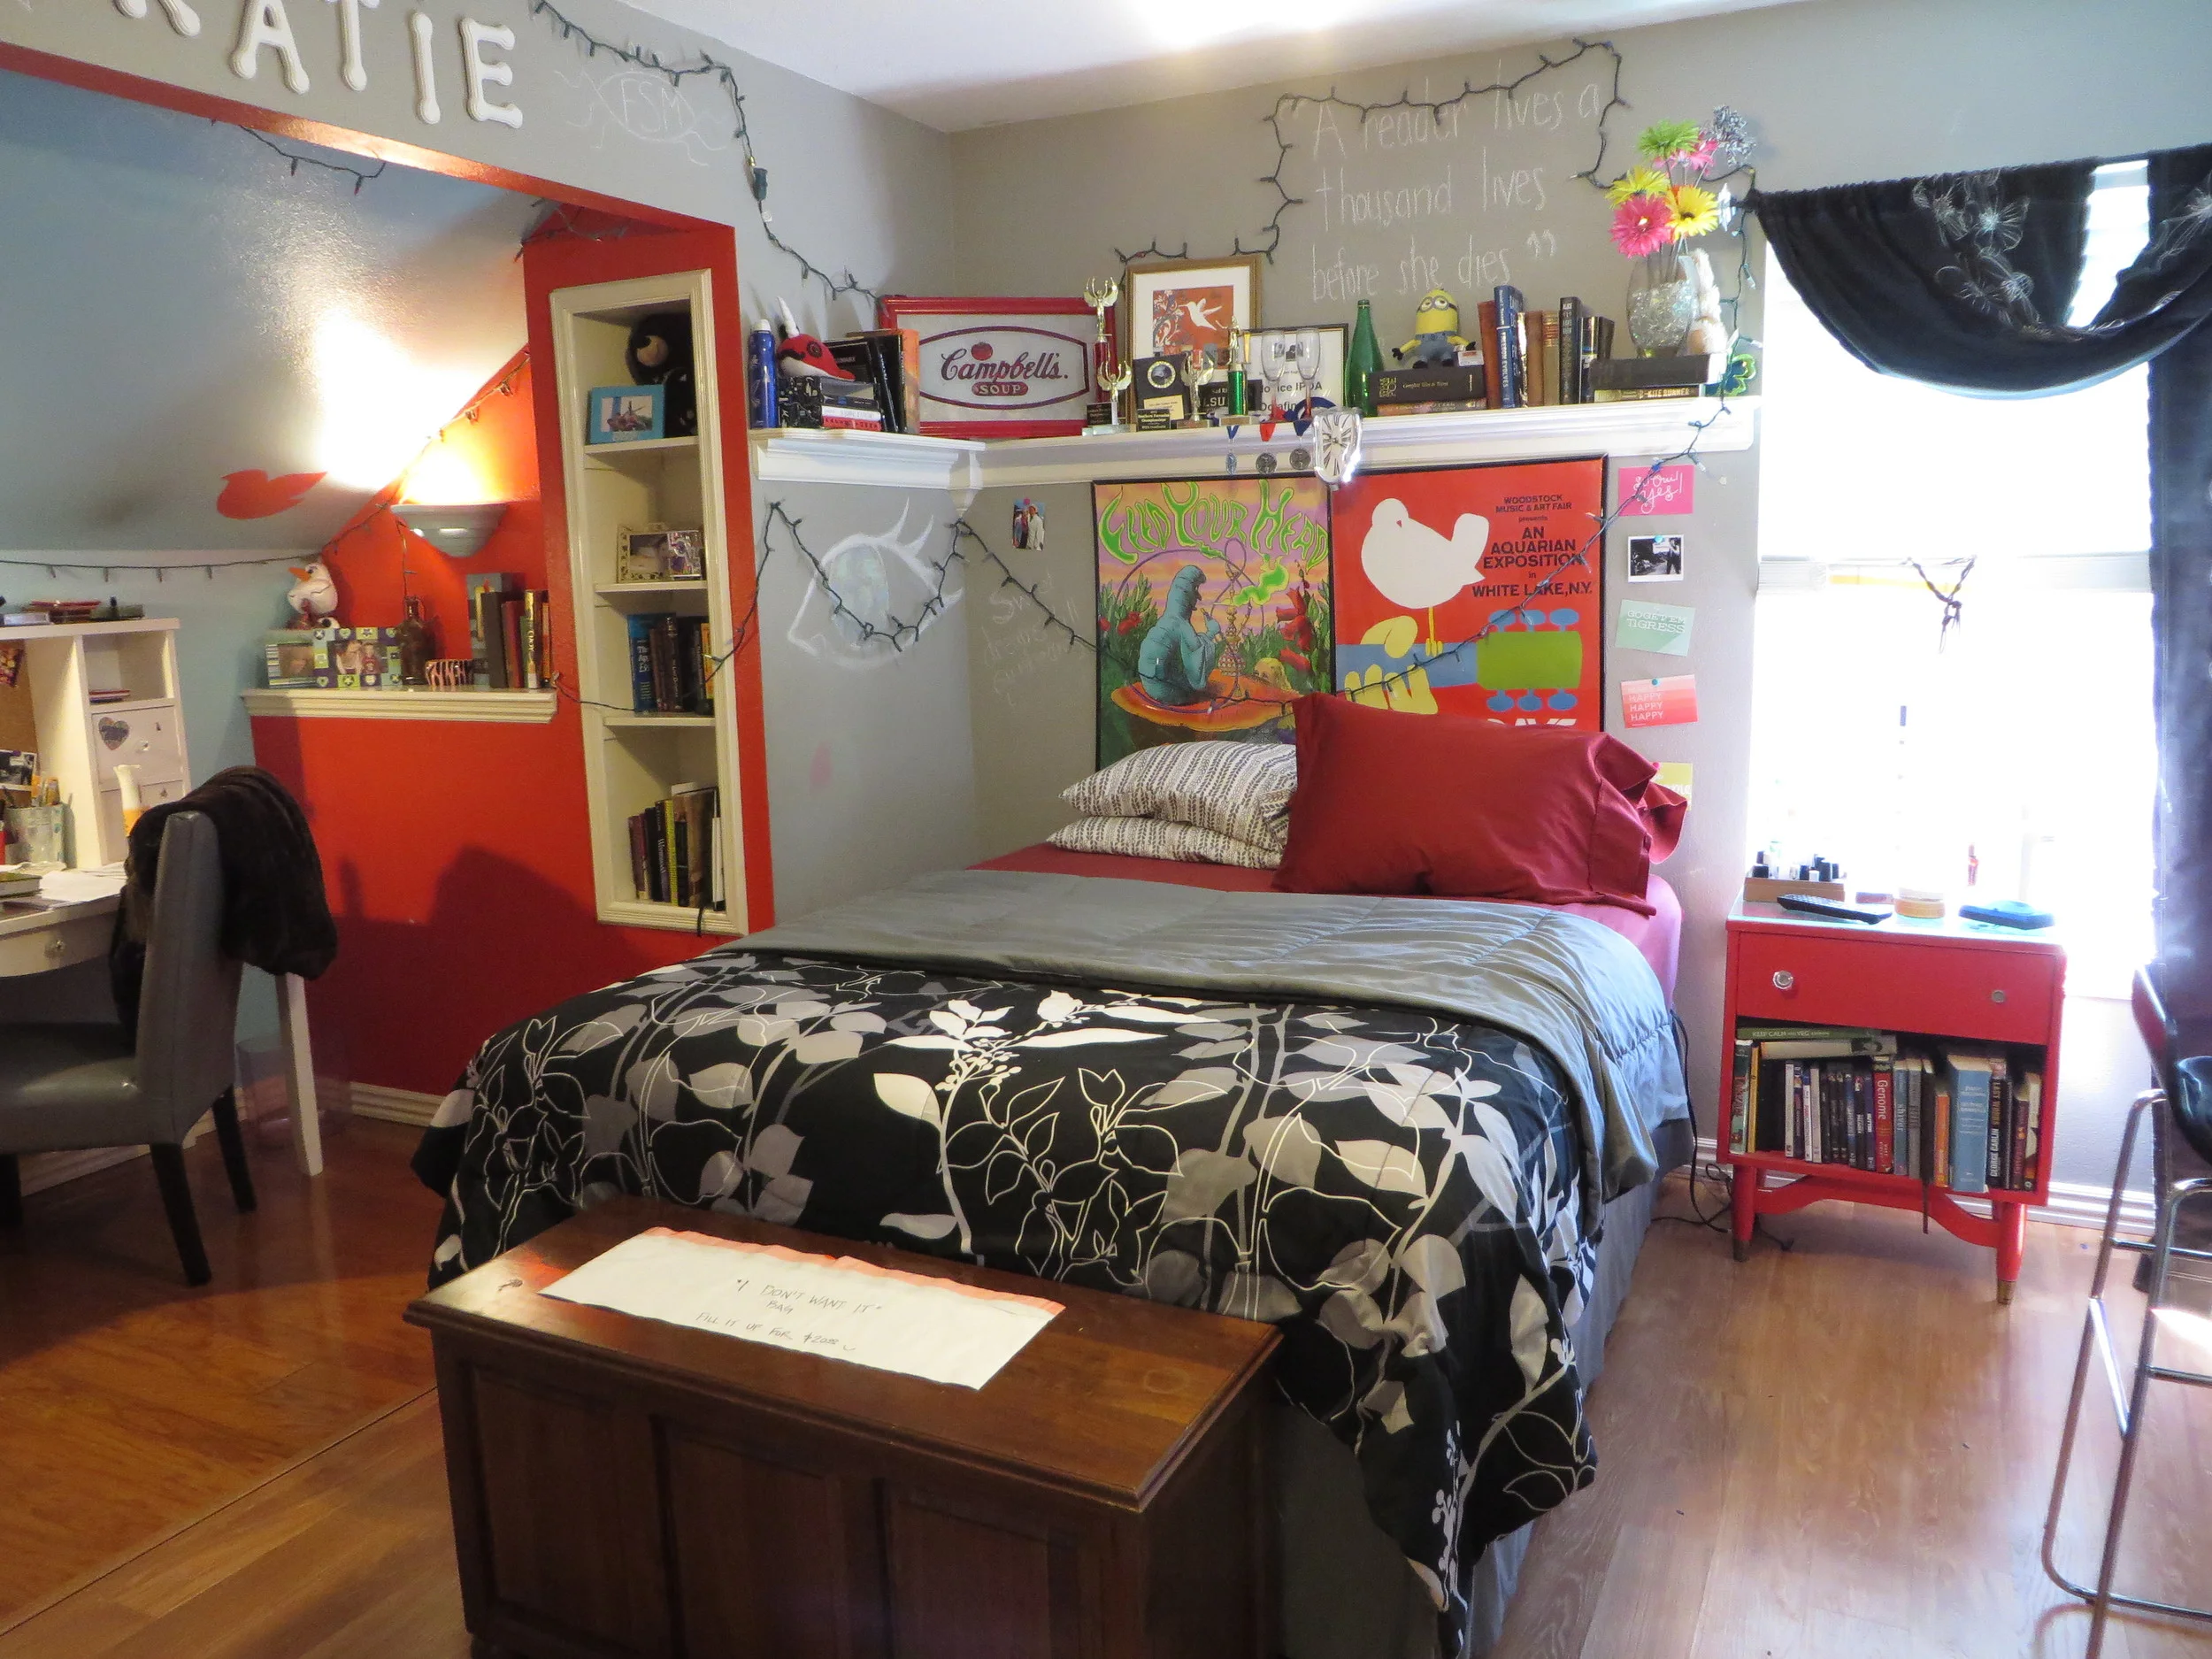
In honor of her birthday, I am going to share her room. She is a teenager so it is rarely this organized and clean! But it is her creation and she loves her "stuff" and her space.

I featured the mural on Katie's wall here....and her "unstuffy" wing back chair here. Since we remodeled her room, she has added a lot of her own touches that make the space her own.

As with most teens, her room in a constant state of OH MY GOSH...CLEAN YOUR ROOM!!!! Dirty dishes, dirty clothes in the clean clothes basket (with the clean clothes still in it!), make-up and hair covering  the floor and trim, dust bunnies EVERYWHERE! Just a mess.

She is a busy girl. She is an outstanding student (4.2 this last semester...she rocks), she works part-time and she was the lead in the spring musical. (Seriously, the girl has some crazy chops!) 

So in spite of all my pleading, begging and bribing, her room stays in a constant state of "mess." Usually the result of just too much "stuff." So a few weeks ago, I decided to take action and tackle the mess.

Since it was in a half-way decent state, I decided it would be a good time to share pictures of ONE of the rooms upstairs! 

I also came up with an idea that MIGHT give her incentive to get rid of "stuff." Keep in mind, kids lack the ability to organize and like most of us, they hang on to stuff that they really don't need or want any longer. It is important to "purge" on a regular basis!

I left this bag on her trunk. I told her I would pay her $20 for every large trash bag she fills with clothes, shoes, books....stuff! What many don't know is you can donate "stuff" to your local non-profit thrift store (Salvation Army, church organizations, etc) and get a receipt for a nice tax deduction. So $20 for a bag of things they no longer want or need benefits both you AND your teen...you get a nice little tax deduction and they get pocket change (or gas money!)

Younger kids can be enticed into "giving" their unwanted toys to kids who NEED them. Start them young! 

I have learned that teenagers tend to be a bit more myopic and aren't as eager to clean out closets and drawers for the benefit of those in need...sad, but true! They want hard, cold cash!

So far I haven't seen the bag...we'll see. This is why I don't give parenting advise. 


Bedroom makeover...part 2? 3?

I don't know how many times I have griped about my master bedroom. So this past month I began chewing away at a few little things I dislike.

It is my favorite room in the house AND my least favorite. My favorite because it is an awesome room...big, bright, cozy. Least favorite because after 13 years, I STILL haven't decorated it the way I REALLY want it.

I blame it on the furniture.

Ornate, heavy, dark, veeeery traditional! I paid entirely too much for it, so I can't bring myself to get rid of it. One bad thing about furniture...no matter how much you paid for it, chances are you are only going to get pennies on the dollar. 

There are a few pieces I would never get rid of...my dad's walnut chair and my grandparent's old trunkThe rest of it...honestly, if I had unlimited funds, it would all go.

But I don't...so it won't. The next best thing is to change it up a bit with a little bit of paint! 

I featured the beside tables and the high boy here!

The next big project was the bed! 

Honestly, this set would be perfect for a chalkpaint and distress treatment. I painted it with Kilz and sanded it and it was so cool looking. But alas, that is not my "thang" so I just went with my go-to Valspar Dune color.

I did finally paint the top of the Duncan Phyfe drum table...bye, bye beautiful mahogany!

I still need to do some kind of little vingette around this table...in time!

I'm not real thrilled with the bed. I had originally planned on painting all the raised part of the head board and just leaving the inset stained but Brian talked me into just painting the top scrolly part...which is really the part I disliked and it seems the paint just highlighted it. (See, I take his advise!) Oh well...it is different and that will do for now!

I also picked up this darling little antique fan at an auction. I'm not really into "froo-froo" stuff just sitting around and eventually it will probably go to one of my flea booths. But I like the color and retro style and it looks kinda cool on top of the highboy...for now! Until I have to dust it!

Now that all the furniture is painted, I REALLY want to install hand-scraped laminate flooring. And I really want to reupholstery the big chairs. Someday!

I found this AWESOME color chart on Pinterest....

I have some white and tan in the throw pillows and bedding but the majority of my white is a little more "off-white" and my walls are more of a "cream" than a tan. I can live without the grey...I like black better. But the blue is the color of my fireplace wall and I am itching to throw the cranberry color in there somewhere. Maybe in the upholstery on the chairs or a large rug on my new floors!

The paddle fans? Hum...might have to do a little a little paddle fan treatment!

So much I WANT to do.

That is one thing one has to understand about home decor. Unless you have A LOT of money and can afford to have a professional designer come in and do it top to bottom (my choice would be Candice Olson!) the best approach is a little bit at a time. 

Don't be afraid to buy used and do a little work to make it your own. As much as I disliked this furniture when it was all stained and matchy-matchy, I'm kind of digging it now! Still want something different, but I like it a lot more now than I did two weeks ago! The floors will come in time and I know someday a piece of upholstery fabric for the chairs will "speak to me" ...someday.

I always tell my kids...it's a good thing we don't have a lot of money...think of all the great things we would never have learned to do had we had the money to pay someone else to do it!

Seriously how much personal satisfaction could one get from having a bazillion dollars and being able to design, built and decorate your "dream" house without concern for costs?

See what paint fumes do to you....

Ivy and Elephants

Happy Father's Day....

My father is no longer with me...but I think about him daily, even after 19 years. I still have a few fathers in my life...Brian and my son-in-law Joel. Both are awesome dads, so today, I want to thank them for being great role models for my sons and grandsons.

Brandon, Mitchell, Matt, Brian and Joel. Christmas 2013....the only day of the year I get a picture of all of us together!!!

You are both AWESOME!

My dad would love what I am doing right now. One of the reasons I think about him all the time is because of the work I am doing! He loved wood working and "projecting." 

Yesterday Brian and I went to a great estate auction. One of the pieces I picked up was a magazine table...solid walnut.

My dad's favorite. I have several pieces he built out of walnut and I buy everything I can if I believe it to be constructed of this amazing, beautiful wood! You will rarely see it in new pieces because of the cost, but in the past it was used extensively in furniture because of it's durability!

I picked up a few other great pieces as well. One was a little antique oak school desk. I bought one identical to it at a garage sale Friday. Funny...I see something unique and the very next day I find one identical. Both have a few "oops" and I am in the process of glueing and clamping so I will share them eventually! Not sure if I am going to restore them to their original finish or give them a little paint treatment! 

I bought this amazing buffet and an armoire that is just too big to put together and photograph right now.

I am debating whether I want to give them a little "paint treatment" or just sell then as is. 

I also bought several smaller items...an old Emerson fan, an ornate iron shelf, lamps and several boxes of glasswares...Bavarian china pieces, Fenton, milk glass and what-nots.

Auctioning is NOT easy...you have to load it, haul it, unload it, clean it, load it, haul it, unload it, tag it and stage it. Something I had planned to do this morning. So I loaded my truck with a bunch of stuff we had hauled home yesterday and put in the garage, only then to notice the dark clouds rolling in. So then I had to unload it AGAIN! Curses.....

I have a garage full of projects that need to be tended to but it's raining. So what do I do? I tear my room apart so I can paint the bed to match the other furniture I gave a little makeover! 

Sometimes I think I should be medicated!

There is a method to my madness...the headboard is just too heavy for me to handle by myself. So I am tearing the bed apart today so Brian can help me haul it to the garage so I can work on it this week. 

Course after tearing the bed apart, I realized I had never shampooed UNDER the bed...and it was kind of nasty. One of the perks to having apartments is you have a rug shampooer...and since we have a puppy in the house, I am keeping it here for the time being (yes, I have had to use it a time or two!) So I shampooed the carpets. I can't WAIT to put down the hardwood in this room...it is the ONLY room in the house that still has carpet! 

Normally we "bloggers" only share the finished and staged products. I am sharing this picture with you so you will understand that "projecting" can create a little chaos in your home. To do what I do you have to have a VERY patient and understanding family. People who know that no matter how comfortable THEY are with the way things are, you are going to make messes! 

Fortunately my family has been around enough to know that 1) when I get a bug, it's happening, 2) when it is done, it will be beautiful! 

Trust...or tolerance...whichever! 

Have a GREAT Father's Day!!!

Bedroom furniture before and after...

As I mentioned in my Home Tour  I am not real fond of my master bedroom decor! I built this master suite 13 years ago and have never decorated it the way I REALLY want it...clean, simple, modern!

Much of it had to do with the furniture I bought...traditional. And VERY expensive, which is probably why I can't bring myself to get rid of it.

The matching large mirror and dresser that was in my office/dressing room got hauled upstairs...until someone buys it. It was just too big. I replaced it with a very small and simple "modern" styled dresser.

But I am kind of stuck with the bed, side tables and high boy for the time being. So it was time to change things up a bit.

For years I have grumbled about people painting wood. Brian has taken that to heart so every time I mention painting stained furniture he freaks. I pretty much do what I think will look best, but I do seek his opinion (he will tell you I rarely actually take it...but that is not true) In this case, we disagreed.

I didn't think painting would hurt it since I didn't really like it anyway...he believes you shouldn't paint stained wood.

He likes "dark," I like "light." 

Differing opinions are what makes the world go round...course they also cause wars but if you respect someone's right to think differently than you, life just goes smoother.

Who makes the final decision? The one who is right...ME! (hahahahaha!)

Anywho, I finally bit the bullet and decided to paint the bedroom furniture. The bedside table on the side I use was a mess, so it definitely needed some TLC!!!

Obviously I do not use coasters....

The table on the side I don't use was in good shape...but I had to do them both since they are a matching set!

This furniture is a classic example of how manufacturers use stain IN the finish...when it chips or you strip the finish, most of the stain color goes away.

I wanted a stained top and painted bottom, so I decided to go with the gel stain on the top...it just seemed easier than stripping the tops down completely to apply a new stain. 

I removed the hardware and painted it black. These are a little froo-froo for my tastes, but I really didn't want to invest money on all new hardware! Remember my little trick about sticking hardware in styrofoam to make it easier to paint!

I didn't like the little "scrolly" things on the corners so I removed those and puttied the nail holes. I kilzed, sanded and painted the base and drawers and gel stained the top! 

Before and after....

At some point I may remove the drawers in one and do an open shelf...would make them a little less "matchy-matchy" and I really don't store anything in the bottom drawers.

After I finished the bedside tables, I moved on to the highboy dresser....

This is a rather large piece so I didn't want to haul it all out to the garage. But honestly, you can't spray paint in the house!!! So I removed the drawers and doors and took them to the garage to spray. I had an oil based paint mixed to match the spray paint I was using and used a brush and sponge roller on the cabinet itself. (I primed it ALL with Kilz and sanded!)

It turned out pretty good EXCEPT...I wanted a satin finish...the formula for the oil-based paint that matched the spray paint color didn't come in satin, so the guy at Lowe's did a "color match." Only problem is, it really doesn't "match" exactly. 

Truthfully, no one but me will probably notice the slight color difference...and as my Daddy always said, "You'll never notice it on a passing train." (wise man!)

Again, before and after....

Now, here is my quandary...I gel stained the tops of the bedside tables in the java color. But after I finished the highboy, I kind of like the original color of the stain on the top...

...so now I don't think I want to do the gel stain on the top of the highboy or the bed! Which means I will have to go back and strip the tops of the bedside tables and try to stain them to match the original stain color...IT IS NEVER ENDING!!!

That will have to wait! My next BIG chore is the bed. I have decided to paint the posts and the frame part of the head board, and leave the "inset" of the head board, the side rails and the panel between the posts on the footboard stained!

While I was in the painting mood, I finally broke down and partially painted one of my Duncan Phyfe drum tables. (As I mentioned here the Duncan Phyfe chairs are for sale at Midtown!)

And for the first time ever, I actually "distressed" a piece I am putting in my home!

(You may notice to the left of this table is one of the mid century cane chairs I featured here. I finished one almost a year ago, but this one sat in my garage waiting to be stripped and refinished...FINALLY!!!)

I am still having a hard time making myself paint the top of the table...the mahogany is just so beautiful! But I know if I am going to keep this piece in my room, I probably need to paint it to coordinate with the other furniture! 

Someday I want to put down dark, hand scrapped laminate flooring. And eventually I will paint the bed. When I do I guess I will paint the top of this table as well. For now, I put another coat of tung oil finish on it and will enjoy the beautiful wood until the day comes when I paint it and the bed!

I would also like to do something awesome on this wall...a beautiful painting, a simple vingette...something. It's only been blank for 13 years...someday.

Right now, I am worn out with these little projects! It may all sound simple, but truth is, it is hard work! So the bed will have to wait...for now. 

In the meantime little Ms. Cleo can enjoy the bed! (As you can see, she has grown a bit since Mother's Day!)

Mid century chair SCORE!! And a Duncan Phyfe chair repair!

SCORE! Seriously, major score! 

Okay, so they don't look so hot right now and they didn't look any better piled on a trailer at the auction, covered in gunk and spider ick! 

Which is a good thing because nobody knew what they were...which means SCORE for ME! Baumritter mid-century dining chairs! Oh my!

I know they look rough right now, but let me work my magic on them! 

Truth is, mid-century furniture hasn't really hit the big time here like it has in other parts of the country and honestly, we don't see a lot of it around here. But occasionally I can find pieces here and there.

I love them...everything about them. The grain and color of the wood after it is refinished (usually walnut or teak), the clean lines, the incredible construction! I love the entire process of restoring these pieces because I know they will take my breath away when I am finished. I also know it is next to impossible to find solid walnut and teak furniture these days.

So...what is my hard-fast rule? If I bring one in, I have to take one out. So sacrifices have to be made and the sacrifice is going to be the rest of my antique Duncan Phyfe chairs! I have already sold 2 and have four left...two painted side chairs and two caption's chairs.

Last year I featured the chair I had to repairI was so proud of myself. I glued and sculpted the chair back that was broken and then painted the two side chairs, which kind of goes against my grain but they turned out beautiful. I didn't paint the caption's chairs....

The repair lasted all of about 6 months...and then the back busted again. CRAAAAAP! 

So this time I decided to "rebuild" rather than repair. 

This would have been SOOOO much easier had I just gone and bought a scroll saw. But oh no...I figured I could do this with my jig saw and Dremel. And I did...but next time I am going to buy a scroll saw!

First thing I had to do was deconstruct the chair to get to the "broken back." Fortunately, these chairs are constructed with dowel rods and the top pops right off...okay, you have to beat on it a bit and chip the paint...but it eventually comes off.

Then I had to find a little piece of wood the same thickness as the back...3/8". I figured that wouldn't be a big deal. It was. I ended up finding some 3/8" pine, but it wasn't wide enough...so I had to do the ole' clamp and glue thing to create a piece wide enough.

This is no big deal...truth is, most large wood slabs, and even smaller ones, are nothing but smaller pieces of wood glued and clamped together...most table tops are constructed that way!

After I let the piece sit for a day or so, (I was busy priming, sanding and painting my bedroom furniture...can't wait to finish and share!) I used wood filler to fill any gaps in the joints, sanded the piece smooth and traced the broken piece onto the wood...

....then I cut it out with a skill saw and dremel.

This is not a job for the faint of heart, impatient people or someone who has had more than 1 cup of coffee. You have to go slow and use a light, steady hand. I actually cut on the outside of my mark and then used sand paper to sand down to the mark. 

This process would have gone a bit quicker had the wood not split a time or two. It never split at the glued joints, just on the grain, which meant I had to glue and clamp the split and wait! Grrrr.....

Anywho, after hand sanding and sculpting for a few hours, I had a piece that was pretty darn close to the original! Then it was just a matter of priming, sanding and painting it.

I reconstructed the chair and hit the entire back with another light coat of paint and sealer.

Presto...ALMOST good as new! Can you tell which is which?

I can...the chair on the left is the repair. The big difference is the "lines" that are missing from the middle...after all the cutting and sculpting and sanding, I wasn't going to risk messing it up by trying to chisel lines in the wood. 

And I will be honest...fitting it all back together was NOT as easy as it sounds...there was some additional sanding and grinding and even a few curse words! But in the end it turned out pretty good!

Also, I noticed the paint has "yellowed" over time. That is pretty common for "whites." Something to keep in mind when contemplating "touch ups." There is a good chance you will have to paint the entire project if the color has faded, yellowed or changed over time!

Now that it is repaired and I feel good that it will hold up, I plan on selling this chair and the matching one and the two caption chairs so I will have room for my mid century chairs when I get them refinished.

If I bring one in, I have to take one out!!!

Hopefully I will get that done before Thanksgiving...or we may all be sitting on lawn chairs!


Repurposing antique dresser drawer fronts...

Last fall I went to a really nasty auction. The place was nasty, the stuff was nasty...and honestly, some of the people were questionable. 

But I scored some really nifty old pieces. Most had to be scrubbed with straight ammonia.

I bought an old solid mahogany dresser that was literally in pieces and had obviously been outside for quite some time. (This is AFTER a good scrubbing with ammonia!)

What I really wanted was the mirror...and sure enough it sold in days! The couple who bought it knew exactly what they were getting...solid mahogany, amazing carvings and unique style! Truly stunning! What was really incredible was the original mirror was still intact and unbroken!

I really wanted to do something with the base, but it would take a pretty extensive repair and rebuild to get it back in shape. A fairly large critter had obviously nested in and nibbled on the drawers and insects had made a snack out of some of the wood. I stuck the base and drawers back in my garden cubby and knew I would eventually have some "stroke of inspiration." I just can't bring myself to toss old wood. I don't normally stick wood furniture out in the elements...but seriously, it had already been outside for who knows how long and I was fairly certain not much more damage could be done!

A few weeks ago I decided to clean out the garden cubby. The drawers had again been nested in and all of it was covered in ants. And I am not sure what kind of spider crawled out of the drawer when I moved it but I'm pretty sure it intended to make a meal of me. 

I carefully pulled apart the dovetail joints of the drawer ...it really wasn't to difficult since any glue used to construct the piece had long since "disappeared." I tossed the bottoms of the drawers, set aside the sides for future use and went to work on the drawer fronts.

The fronts are not what one normally finds with older furniture...veneer over solids. Nope...these drawer fronts were solid mahogany. Surprisingly, they were not warped or twisted which tells me the wood was well cured when the dresser was constructed.

The black stuff is the old finish...it literally flaked right off when I scraped it with my fingernail.

The old hardware is amazing. I suspect the plates are copper. There are two eye bolts through each side of the plate and they are affixed to the back with little square nuts. A decorative "handle" is looped through the eye bolts. I decided not to paint them or even clean them up. I pulled them off so I could easily sand the pieces. The bolt threads and nuts were pretty rusty so I sprayed them with a little WD40 just to make them thread easier.

I sanded the drawer fronts, scrubbed them with varnish remover, and then wiped them down with Watco Teak Oil Finish. After the finish had dried, I added two cast iron hooks I've had in my hardware stash for some time! 

I attached two loop fasteners to the back.

Beautiful! I love them so much there is a good chance I may keep one for myself. The wood is magnificent! They would be perfect in a bathroom or by a door for hanging coats and purses! 

Not sure where the inspiration came from, but they are beautiful, useful, AND unique! Mr. Morris would be proud! 


Arch window covering and temporary window coverings!

It's that time of the year...time to put up the blinds and shades to keep out the blazing sun and cool down the house a bit!

This past week Brian and I put up the outside roll-down blinds that cover the west-facing windows in my den! I love all the natural light, but when the sun hits those windows around 4:00 on a hot summer day, oh my! 

Hanging the blinds on the OUTSIDE makes a huge difference...and honestly it makes this room much more comfortable in the summer! (As you can see, I turn the couch around in the summer!)

The arch window in my living room is another story! I know....arch windows are soooo 90s. But that was when this house was built so that is what is there! It is a great place for fall and Christmas displays!

It would be very difficult to put a blind on the outside of the this window...so I had to settle with putting something on the inside. 

This is how bright it is BEFORE I put up a blind....

And AFTER...

Seriously, no Photoshop and no camera tricks. Before and After...within a few minutes. That is how much difference there is and it makes a huge difference in the temperature of the living room!

Fortunately my living room is two stories, so it still FEELS bright and airy, I just don't have the blazing sun heating up the room!

I couldn't really afford a "custom" blind for this arch. When I was searching for a solution, I stumbled across a "temporary" pleaded blind...maybe $15.00. It is perfect! When I put my fall decor up in the fall I take it down, fold it up and store it away until late spring. It has a clear plastic "base" that sits in the middle of the window and you just drop one end of the pleated blind into the holder, "fan" it out and secure the outside ends. It came with a "peel and stick" adhesive on the base of both sides, but that was pretty much shot after the first year. So now I either tape it or tack it down. Even though it is just a cheap little thing, it has lasted a good 5-6 years! Worth the small investment!

So if you have a room that is uncomfortable because of the heat generated by the summer sun, think about using temporary window treatments! You just might find the room a little more enjoyable and you will help cut down your cooling bills. 

Finding cheap DIY supplies!

Whether you are refinishing a dresser or remodeling your kitchen or bath or rehabbing an old chair, you are always going to need "supplies!" I shared a few tips on this subject last year! Individually, the supplies aren't that expensive...but it can add up real quick if you do a lot of projecting or are working on a large project!

There are a few things I don't skimp on...paints, finishes, stains. I buy a lot at Habitat and thrifts stores, but I rarely by "used" or obviously "old" paints and stains. There is just no way to know if they are still chemically balanced and I am not willing to take chances with my finish products. I do look for cans of mineral spirits or varnish remover because I use both a lot and they really don't "go bad."

But along with the basics, you always need brushes, sponges, rags, sanding pads, etc. In my quest to do 10 projects at once this weekend, I stumbled on an ingenious way to save on the sponge pads I use to apply oil finishes and stains.

It's not like they are super expensive. As I have mentioned numerous times, you can pick up a package of two at Lowe's for a little over $2. But why pay ANYTHING when you can make them for almost free!

One thing I always pick up at thrift stores and garage sales is old cotton socks. I use them by the boat load when I am doing a gel stain treatmentI like to be able to toss anything that is gunked up with stains and finishes so I don't have to wash them...so I always have a large stash of shop rags and socks!

This weekend I had several upholstery projects I was working on. I was also putting gel stain on the tops of my bedside tables. Foam...socks...hum? Isn't that pretty much what my foam stain pads are...

SURE IS! Cut the foam into little chunks and stuff them in the socks. Perfect for applying the tung oil finish on the second mid century barrel chair I am FINALLY refinishing! 

They are also perfect for applying stains and wipe-on poly! Then just toss it after you use it! Most projects require 2-3-4 coats of stain, poly or finish and now you won't feel bad about tossing the applicator between coats!

I paid a dime for a pair of old socks at a garage sale and the foam is free. Awesome! 

It's not that these things are expensive but the cost adds up fast when you do a lot of projects or if you are going to tackle a larger project! 

Towels can be bought for next to nothing at thrift stores and garage sales. Just cut them up, wash (to remove any lint) and use them for shop rags. Or you can stop in your local commercial laundry service and see if you can buy old stained towels and washcloths in bulk for next to nothing. I have a tenant who works for a commercial laundry service and she brings me bags of old stained hand towels and wash cloths! Perfect. 

Socks...again, thrift stores and garage sales....pennies! Cotton socks are a must for staining and you need something cheap enough to toss after you use it! 

Paint brushes can be pretty expensive (I highly recommend Purdy) and are a great thing to pick up at Habitat...IF they are good quality brushes and have been kept clean. Don't EVER buy or use "cheap" paint brushes to apply paint...your final finish will look cruddy if you use cheap brushes!

I have always used steel wool for stripping old finishes and sanding between finish coats. But when I refinished this Drexel coffee table I had to use the 3M finishing pads. One thing I love about them is I can rinse them out with mineral spirits, hang them to dry, and reuse them....over and over! It's not that steel wool is really that expensive, BUT IT ADDS UP!!!

Old coffee cans, butter and whip cream tubs, metal bowls...any container that can be used to mix chalk paint and then toss after use is great! Measuring cups and spoons, small hobby brushes, tools...all a must in your "redo" stash...pennies at garage sales and thrift stores! 


Precious little metal "ice cream" chairs before and after!

I bought these pathetic little chairs at an auction last fall....

...neglected for who-knows how many years in an old outbuilding. Rusted, rotten...so sad. 

Then they were neglected for months in my garage because of the "rust issue" I just had no desire to tackle. But I did...and truthfully, it is not that big of a deal (check out how to deal with rust here)....

Then they sat in my garage for ANOTHER month.

They are so darling and I knew I wanted to do something bright and fun with them...I just didn't know what. I get serious mental blocks on upholstery projects!

(I can always tell how long a "project" has been around just by the grass...in the "before" pictures my bermuda is dormant...now it is lush and green and needs to be mowed twice a week!)

So I went to the fabric store and found the brightest and most colorful fabric I could find! 

Red for the frame...red is cheerful and fun and since the fabric had every color imaginable, it was perfect!

After dealing with the rust and giving them a good dose of primer (and of course the primer had to cure for a month while I mulled over colors), I sprayed the frames with red spray paint. I cut new seats and backs out of 3/8" plywood and covered them with new batting and the bright fabric .

Here is a little hint...if the "frame" where the back goes is 11", do not cut a new board 11", cover it with new fabric and batting, and expect it to fit. It won't.

The big button (almost) dead center in the flower was a fluke! The original back had a big button and I knew I wanted a button.

So this gives me the perfect opportunity to share how to make buttons for any project...chairs, pillows, headboards! Anything that has or needs a button...you can MAKE one out of any fabric!

Just buy a button kit...they have them at the fabric stores and most hobby stores. There is a template on the back for the fabric cutout and they come in all different sizes....

They are super easy to make! Just follow the directions on the back of the package!

TIP...put a dab of hot glue on the back of the front of the button before you hammer the back on and then put a dab of hot glue on the little U hook on the back of the button. A few times the back has separated from the front or the little U hook has come off the back...the glue just reinforces them a bit!

To attach the button, I measured and located the center of the board, drilled two small holes, threaded wax covered string on a large upholstery needle from back to front, through the front padding and fabric, slipped the button on the string, then threaded it back through and tied it off. Then I put a little dab of hot glue on the knot. Super simple!

I padded the back with a little batting and covered it with red fabric!

I love these little chairs...if I had somewhere to put them, I would keep them! Darling!

When I step outside my comfort zone and go with bright and colorful, I am never disappointed...maybe I should take that into consideration next time I makeover something I intend to keep!

And here is a little "upcycle" hint. I had an old outdoor chair cushion that was thrown in a pile of things I picked up at an auction. The fabric was crud but the batting inside was good. I took the fabric off and used the batting that was inside for this chair and saved the rest for future projects. Free padding!

Chairs, chairs and MORE chairs (and a little tip on homemade chalk paint)!!!

As I have admitted before, I have a thing for chairs. I'm not sure if it is because so many old chairs are constructed with beautiful wood or if it is because they can be picked up cheap at auctions or if it is just because I have a fetish! (If you "search" chairs on my site, you will understand just how bad it is!)

Regardless, I have quite a few piled up in my garage so it was time to go to work!

I featured the prep work on these darling little metal chairs here....

Okay, so they didn't start out so darling...but they are getting there! I have painted them and cut and covered the new back and seat. I can't wait to reveal them! Super cute!

This old gal was a hot mess!

I discovered the chair had been painted a pretty green at one time. I had every intention of stripping and refinishing her, but the "painted and distressed look" is all the rage right now so I went with it. She is painted and in the process of being reupholstered. I don't want to give away the big reveal but purple IS the hot color this year....

I did manage to get two chairs finished...

One is a rocker and the other is a side chair. Structurally they are in mint condition! They are solid mahogany and I really planned to strip and refinish them. But again, I've got to go with the flow!  So I painted, distressed and upholstered the seats. I still have the rocker at home and have taken the side chair to Midtown!

The fabric used on the seats is actually a king size coverlet I bought at a garage sale.

I love it so much I actually used it on the awesome mid century chair I am keeping for my office (featured here....)

....and I plan to make pillows out of the fabric I have left! I love making pillows out of "recycled" blankets and shower curtains. Okay, "love" is a strong wood...I do not LOVE to sew at all. But I do love decorating with pillows.

TIP!!! I have been making my own chalk paint for several months and the more I come to terms with painting furniture, the more I have used it! I have previously shared the recipe....1 cup paint, 2 1/2 tablespoons plaster of paris, 1 1/2 tablespoons water....mix the plaster of paris and water together VERY well, before adding it to the paint!

As I have mentioned often, I am a pinch of this, toss of that kind of person. Well, that does not work with homemade chalk paint! Don't guestimate!!! I was having trouble with my paint "flaking" more than "chalking." I ASSUMED that a higher ratio of plaster of paris would make it "chalk" better...not so. I started actually using my measuring devices and following the recipe to a T...and the paint does exactly what it is suppose to do now! Moral of the story...use your measuring spoons and cups...there is a specific recipe for a reason! This site gives great reviews and advice on using different recipes for chalk paint! As always I suggest experimenting and using what works best for YOU! 

Much done...much more to do. I hope to finish the little metal chairs this week...and MAYBE get the other chair reupholstered sometime this century. Believe it or not, I still have 3-4 more chairs waiting to be rescued!

WHERE ARE YOU?

Did you know that every time you visit a website your IP address shows up on the stat page....so the site "admins" can see all the IP addresses that visit. 

Now don't panic...it's not your PHYSICAL address...just your IP address assigned to your computer. And most people have what is called a "static" address which means it comes from a "pool" of IP addresses assigned to a service provider...and that number can actually change from time to time...ergo "static." So if someone runs a search on your IP address, they most likely will just get the location of your service provider. 

Sometimes I will run trace an  IP number that shows up on my stats page. Okay, I know that may seem a little "stalkerish." But seriously, you can't really find out someone's home address or anything...just their general location...and I think it is neat that people in Maine and Oregon and Utah can see what I am writing about. Just interesting...and kind of weird...

Probably not as weird as my sitting here actually doing IP traces (seriously, I have stuff to do!) But it makes me wonder....

Where are YOU? You know where I am, but I have no idea where you are coming from!!! How cool is it that we are communicating with and reading about people thousands of miles away...maybe even in another country? Sometimes I will see a chair or something on another blogger's site and think "Man, I want that!" only to realize it is in Minnesota...and I'm not!

So if you get a minute, just type in the comment section (at the very least) what state you are visiting from! And as we say in Arkansas "YA'LL COME BACK!"